Overview
The IoT gateway is an intelligent central hub for IoT devices. IoT gateways connect devices within the Internet of Things to one another and the cloud, translating communication between the devices and filtering data into useful information.
Some of the most common uses for the IoT Gateways include:
- Connecting devices to one another.
- Connecting devices to the cloud.
- Translating communication between IoT devices that are manufactured or operated by different companies.
- Filtering data.
- Mitigating security risks.
- Intelligence at the edge.
Gateways in Upkip
Purpose: Gateways are configured in Microsoft Azure as IoT Devices or IoT Edge devices and are installed on the computers on the manufacturer premises.
They act as a Cloud Gateway which:
- Connects with on-premises hardware.
- Reads transforms and buffers data by different adapter modules.
- Interacts with the Azure Cloud infrastructure to send data and receive configurations.
- Is set with Recovery settings to Restart 15 minutes after each failure.
Precondition: Log in to Upkip Administration with Microsoft user. Select Organization.
Select the menu Gateways.
- The page Gateways is opened.

Figure 1: Upkip Administration Gateways
For example, in the Upkip Administration are used the following gateways.
Used by the system internally:
- Calculated Tags (DeviceId: CalculatedTagAnalyser)
- ExternalTelemetry (DeviceID: ExternalTelemetryProcessor)
- Warnings (DeviceID: EventProcessor)
- Health Check (DeviceID: HealthCheckTestSensor)
- Synchronizer (DeviceID: RefreshTimer)
Software gateways installed on premises:
- Windows (Developed as a windows services)
- Linux (Edge) (Developed as Azure IoT Edge devices)
For different adapters developed in the Upkip platform and their configuration go to Adapters configuration.
Create Windows Gateway
To create a gateway first create a gateway device in the Azure IoT Hub /Devices and then install the service UpkipGateway.
Purpose: Create a gateway in the Upkip organization. The gateway is created as Azure IoT Hub/Device.
Select menu Organization/Gateways:
- The page Gateways is opened.
Click the button Create.
- The form New Gateway is opened.

Figure 2: Gateways - create new gateway
Fill in the form:
- Name - the gateway name visible in the list.
- Device ID - the gateway name in the Azure IoTHub Devices.
- Is Edge - if checked the IoT Hub/IoT Edge device is created, if not checked – IoT Hub/Device is created.
Fill in the form without checked Is Edge and click the Add button.
- The new IoT Hub Device is created.
- The device appears in the Gateways list.
Select the created device in the list and open at the right tab Details.
- In the Details tab there is Download Installer button.

Figure 3: Gateway Details - download installer
Click on the button Download Installer.
- The zip file GatewayInstaller.zip is downloaded.
During the download of the Gateway installer is executed:
- The GatewayInstaller.zip is downloaded from the azure storage.
- In the Gateway sources, there is a file XXXXXGateway.exe.config. Two keys are replaced and updated:
- In the <appSettings> the value of APPINSIGHTS_INSTRUMENTATIONKEY is updated. The key is taken from the azure resource of type Application Insights.
- In the section <connectionString> - the connection string is updated.
- The GatewayInstaller.zip is downloaded with updated settings in the config file.
Install Windows Gateway
Purpose: The gateway installer is used to install on the local computer the gateway service.
Follow the steps to install the server UpkipGateway on the local computer.
- Unzip the file in some folder. There are:
- Folder Gateway with sources of the gateway.
- Two PowerShell scripts - InstallService.ps1, UninstallService.ps1.
- Right-click on the InstallService.ps1 and select Run with PowerShell, click Y
- The Administrator:Windows PowerShell windows is opened.
- It is prompted: "Input the installation directory in format 'C:\Some\Path”:
- Enter the installation directory and press Enter.
Results
- In the entered folder is created folder UpkipGateway with 5 subfolders: Backup, Gateway, Install, Tools, Updater.
- In the folder Gateway are placed sources of the gateway.
- In the Install folder are placed both PowerShell scripts InstallService.ps1, UninstallService.ps1.
- Install script is executed and the service UpkipGateway has created and started.
Verification
Open the PC application Services.
- There should be created service UpkipGateway with Startup type Automatic and status Running.
Install a new version of the gateway
- Download a new zip file with Gateway Installer. Run in a PowerShell window the InstallService.ps1 and enter the same Path.
Results
- The structure of UpdateGateway with 5 subfolders is saved.
- In the Installer folder are placed the new Gateway and both PowerShell scripts.
- In the Backup folder is placed the old Gateway folder with added to the name 'YYYY-MM-DD hh:mm'
- The new service UpkipGateway has been installed and started.
Delete Windows Gateway
To delete a gateway first uninstall the service UpkipGateway and then delete the gateway device from the Azure IoT Hub.
Uninstall Windows Gateway
Purpose: Uninstall the created service UpkipGateway on the local computer.
From the Install folder, right-click on the UninstallService.ps1 and Run with PowerShell.
Result
- The Administrator: windows PowerShell window is opened and the script is executed.
- The service UpkipGateway is deleted. Press Enter to exit.
- The folder structure UpkipGateway remains not changed.
Delete Windows Gateway
Purpose: Delete the created gateway device in the Azure IoT Hub.
Open the Upkip Administration. Select menu Devices/Gateways. Select the created Gateway in the list. Click Delete button. Confirm Delete.
Result
- The device is deleted from the Azure IoT Hub/Devices.
- The device is removed from the Upkip Administration, Devices/Gateways list.
Create Linux Gateway
To create a gateway first create a device in the Azure IoT Hub/IoT Edge and then install the gateway on the Linux machine.
Purpose: Creating a gateway in the Upkip organization. The gateway is created as Azure IoT Hub/IoT Edge device.
Select menu Organization/Gateways:
- The page Gateways is opened.
Click the button Create.
- The form New Gateway is opened.

Figure 4: Gateways - create new Linux gateway
Fill in the form:
- Name - this is the gateway names visible in the list.
- Device ID - this is the gateway name in the azure IoT Hub/IoT Edge devices.
- Is Edge has to be checked.
Click the Add button.
- The new IoT Hub/IoT Edge device is created.
- The device appears in the Gateways list
Select the created device in the list and open at the right tab Details.
- In the Details tab there is Download Installer button.

Figure 5: Gateway Details - download installer
Click on the button Download Installer.
- The zip file GatewayInstaller_<DevID>.zip is downloaded.
- The information warning is displayed.

Figure 6: Linux gateway - install instructions
During the download of the gateway installer is executed:
- The device connection string has added into install *.sh scripts.
Install Linux Gateway
Precondition: The Linux OS has to be installed on the computer on premises.
Purpose: The gateway installer is used to install the gateway on the Linux computer.
The supported Linux operation systems are: Ubuntu 18.04, Ubuntu 20.04, Debian, Red Hat Enterprise Linux, Raspberry Pi.
To install the Linux gateway follow the steps:
- Unarchive the zip file
- There are 5 install scripts for the 5 Linux operating systems: Install_Ubuntu_2004.sh, Install_Ubuntu_1804.sh, Install_RedHatEnterprise_8x(amd64).sh, Install_RaspberryPi_Latest.sh, Install_Debian_11Bullseye(arm32v7).sh.
- There are 2 uninstall scripts: Uninstall_RedHatEnterprise.sh, Uninstall_UbuntuDebianRaspberry.shInstall Linux Gateway.
- Log on the Linux computer.
- Copy the corresponding shell install script on the Linux computer according to the installed Linux operating system.
- Go to the folder with gateway install script.
- Make the file executable by command “chmod +x <filename>
- Run the script by “./<install_script_name.sh>”
Result
- The log is listed on the screen with executed actions.
- Wait the script to finish.
Verification
To verify that installation is successful in the log should be:
System services:
aziot-edged             Running
aziot-identityd         Running
aziot-keyd              Ready
aziot-certd             Ready
aziot-tpmd              Ready

The last line in the log should be with:
Name: edgeAgent,  Status: running.
Delete Linux Gateway
To delete a gateway first uninstall the Linux gateway and then delete the gateway device from the Azure IoT Hub/IoT Edge.
Uninstall Linux Gateway
Purpose: To uninstall the Upkip Linux Gateway.
To uninstall the Linux gateway follow the steps:
- Log on the Linux computer.
- Copy the corresponding shell uninstall script on the Linux computer according to the installed Linux operating system.
- Go to the folder with gateway uninstall script.
- Make the file executable by command “chmod +x <filename>.
- Run the script by “./<uninstall_script_name.sh>”
Result
- The uninstall log is listed on the screen with executed actions.
- Wait the script to finish.
Verification
- All script actions should be finished successfully.
Delete Linux Gateway
Purpose: To delete the created in the Azure IoT Hub/IoT Edge device.
Open the Upkip Administration. Select menu Devices/Gateways. Select the created gateway. Click Delete button. Confirm Delete.
Result
- The device is deleted from the Azure IoT Hub/IoT Edge devices.
- The device is removed from the Upkip Administration, Devices/Gateways list.
Data Communication
Precondition: The machine is added to the organization tree.
The Add sensor form is opened following the steps in Add machine.
Machine properties are added in General and Analysis sections by following the steps in Machine Properties.
The section describes the machine gateway configuration and communication settings:
- Data communication template
- Device Controller type
- Communication type
- Gateway
- Communication settings
- Update machine properties
Data communication template
Precondition: The Add sensor form is opened following the steps in Add machine.
Select a template from the Teampate Name dropdown menu in the General section.
- After selecting a template name, it is automatically loaded in the Data Communication section Device/Controller type and Communication type disabled.
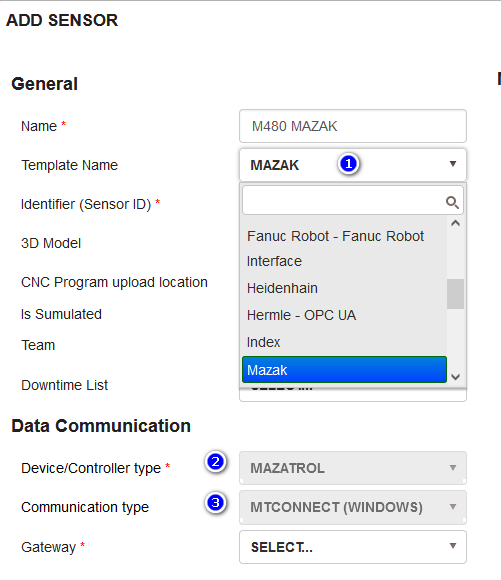
Figure 7: Add machine - select template
When you select the New option for the template name, a message is displayed prompting to select Device/Controller type and Communication type. When the machine is saved, a new template named Device/Controller type - Communication type is created, for example MAZATROL - MTCONNECT (WINDOWS).
Device Controller type
Precondition: The Add sensor form is opened following the steps in Add machine.
The user can create a new name or select from the list of already defined to label the machine/device controller type.
Selecting Add from the dropdown list opens a form to add a device/controller type name.
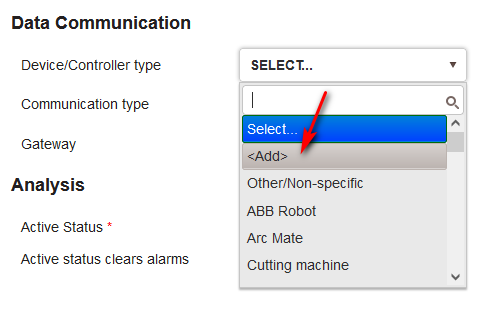
Figure 8: Select Add to add a new device/controller type
Enter name of the device/controller type, click Add.
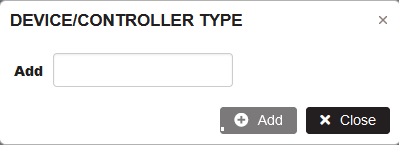
Figure 9: Add a new device/controller type
- The new device/controller type appears in the dropdown list.
Select the machine controller type from the list.
Communication type
Precondition: The Add sensor form is opened following the steps in Add machine.
Users must select a machine communication type from the dropdown list of adapters in Upkip, developed as IoT Hub IoT Device modules running on Windows or IoT Edge device modules running on Linux OS.
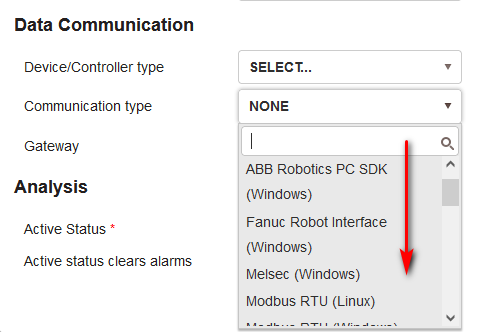
Figure 10: Select communication type
The list of supported adapters in Upkip.
| WINDOWS ADAPTERS | LINUX ADAPTERS |
|---|---|
| ABB ROBOTICS PC SDK (WINDOWS) | MODBUS TCP (LINUX) |
| FANUC ROBOT INTERFACE(WINDOWS) | MODBUS RTU (LINUX) |
| MTCONNECT HEIDENHAIN INVENTCOM (WINDOWS) | MTCONNECT (LINUX) |
| MELSEC (WINDOWS) | OPC UA (LINUX) |
| MODBUS TCP (WINDOWS) | REST(LINUX) |
| MODBUS RTU (WINDOWS) | SIEMENS S7 (LINUX) |
| MQTT (WINDOWS) | |
| MTCONNECT (WINDOWS) | |
| MTCONNECT FANUC FOCAS (WINDOWS) | |
| OPC CLASSIC (WINDOWS) | |
| OPC UA (WINDOWS) | |
| PICO DATA LOGGER (WINDOWS) | |
| PICOLOG 1000 SERIES (WINDOWS) | |
| RPC SINUMERIC (WINDOWS) | |
| SIEMENS S7 (WINDOWS) |
Note! For more details, see Adapters section.
Gateway
After selecting the machine communication type as a Windows or Linux adapter, the Gateway dropdown list is loaded with the available gateways corresponding to Windows or Linux.
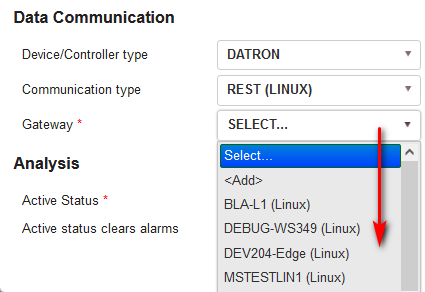
Figure 11: Select Linux gateway with Linux adapter
The user can select a gateway from the dropdown list or create a new gateway by selecting Add from the list.
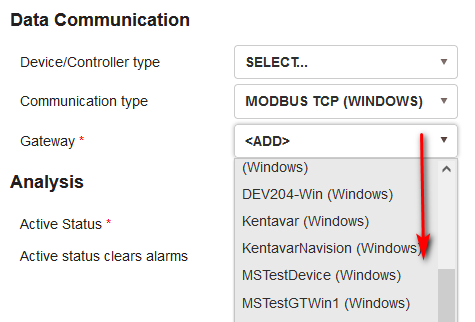
Figure 12: Select Windows gateway with Windows adapter
When Add is selected from the list, a New Gateway form is opened.
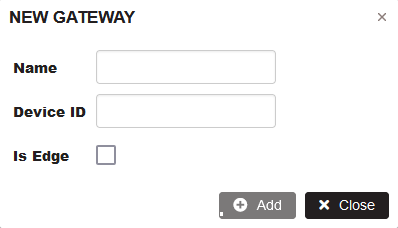
Figure 13: Add new gateway
Fill in gateway details.
- Name (the gateway name in the Upkip gateway list).
- Device ID (the gateway name in IoT Hub).
- Is Edge.
- If unchecked, a gateway will be created as an IoT Hub Device (running on Windows).
- If checked, a gateway will be created a gateway as an IoT Hub Edge device (running on Linux).
Click the Add button.
- The new gateway is created in Azure IoT Hub and appears in the list.
Note! When you create a Linux gateway, additional custom gateway deployment must be done to make it usable. Ask the platform administrators for further information.
When all the required data in the machine properties form is filled in, click the Add button.
- The machine is added to the selected department with their properties.
Communication settings
Precondition: The machine has been added to some department with their properties.
Select the added machine in the organization tree. Click the Properties tab.
- The machine Properties form opens.
- On the right side Data Communication Settings related to the selected Communication Type and Gateway are displayed.
In the Data Communication Settings, a predefined set of fields for user-configurable settings appears based on the adapter type. The settings are sufficient for normal communication with the machine.
Before some fields there is an information icon (“i” sign). Hover the icon, a tooltip is displayed explaining the format of the field data. For other fields without an information icon and tooltip, the field label is sufficient to inform the user about the format of the field data (e.g. port, IP Address, etc.).
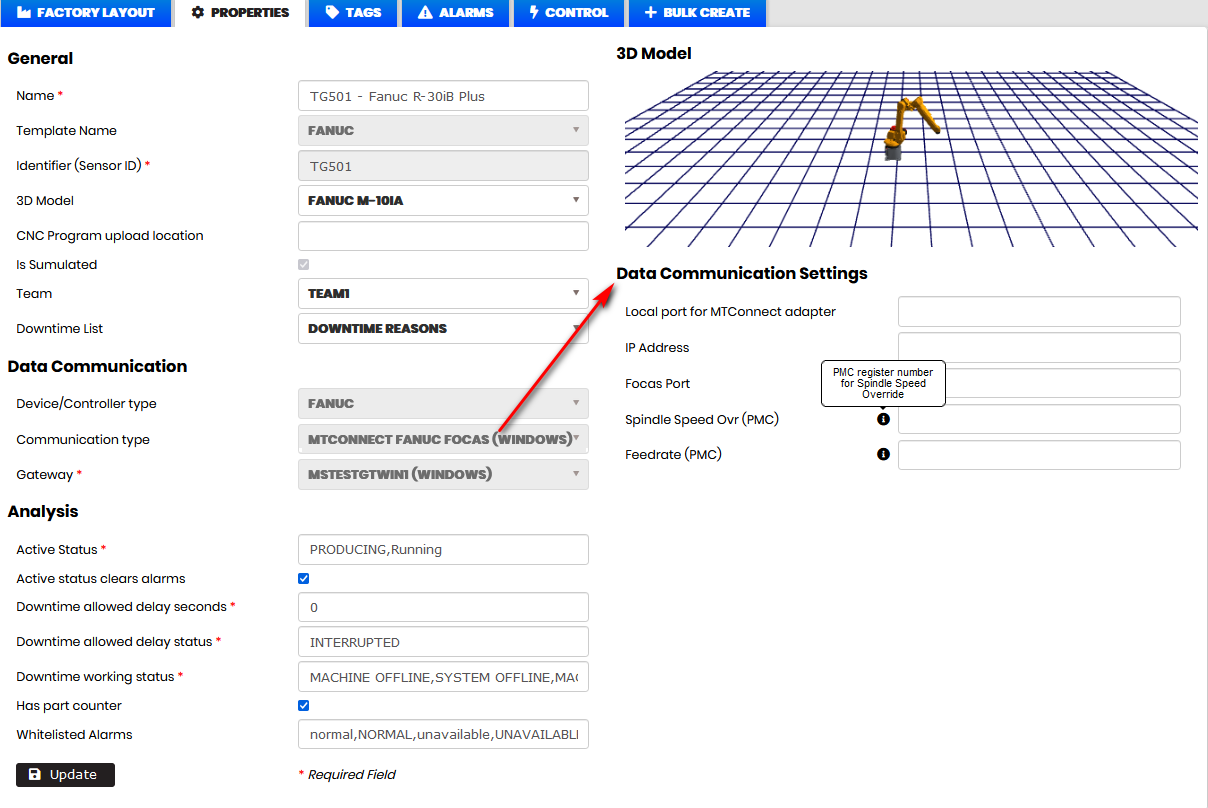
Figure 14: Machine properties with data communication settings
Fill in the data communication settings fields with the requested machine communication data. Click the Update button.
- A module related to the communication type is created in the gateway.
- Machine communication data is sent and updatged in the gateway module.
For example, if the machine has an adapter type SIEMENS S7 (WINDOWS). Fill in the machine communication data and click Update.
- Machine data is sent and updated to the gateway module.
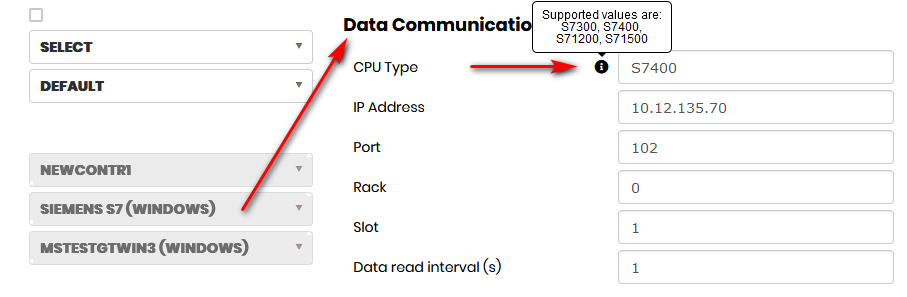
Figure 15: Machine communication settings for SIEMENS S7 (WINDOWS)
Select the GATEWAYS menu, select the machine gateway and click the Modules tab. Select a Siemens S7 module.
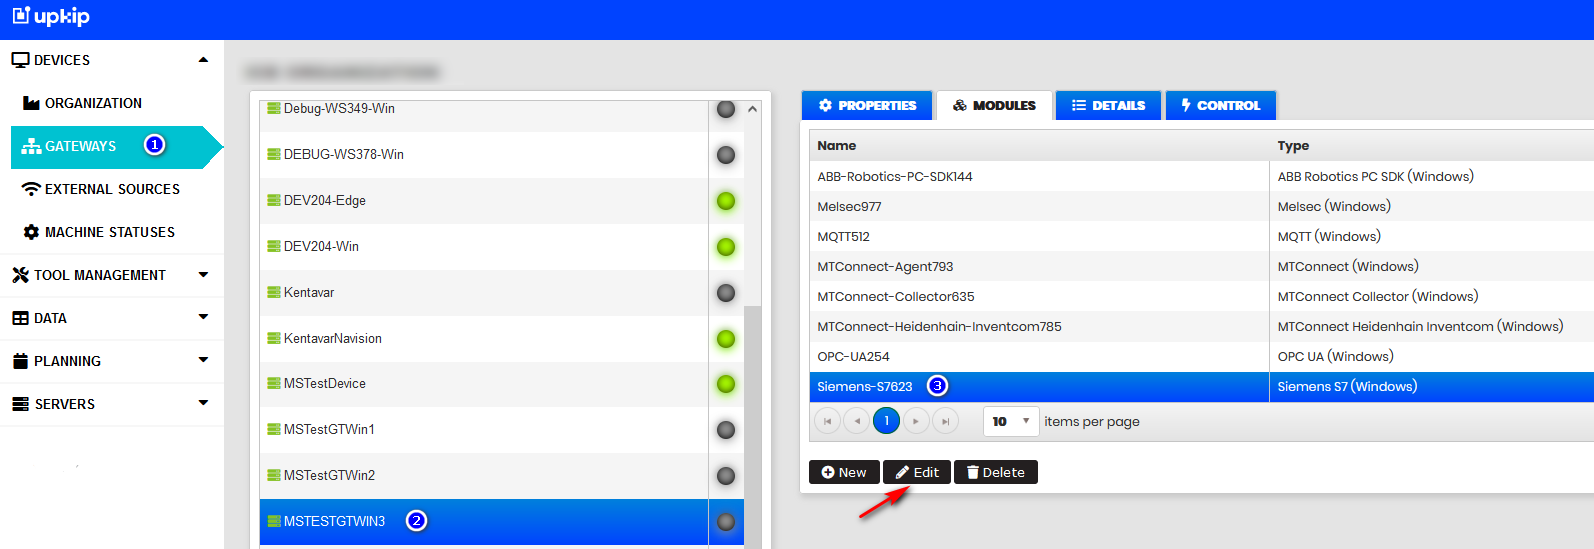
Figure 16: Gateway module with machine configuration
Click the Edit button.
- The Edit module form opens. In the module Desired configuration, the machine configuration settings data is added or updated in a JSON value.
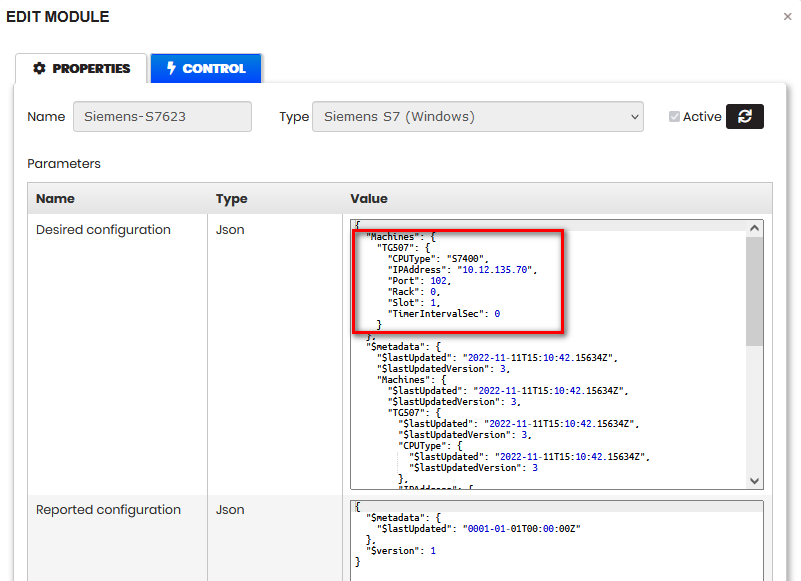
Figure 17: Gateway module with machine configuration data
For example, if the machine has adapter type ABB ROBOTICS PC SDK (WINDOWS) with filled communication data.

Figure 18: Machine communication settings
- After clicking Update for the machine properties, the module is created (or updated) in the selected gateway.
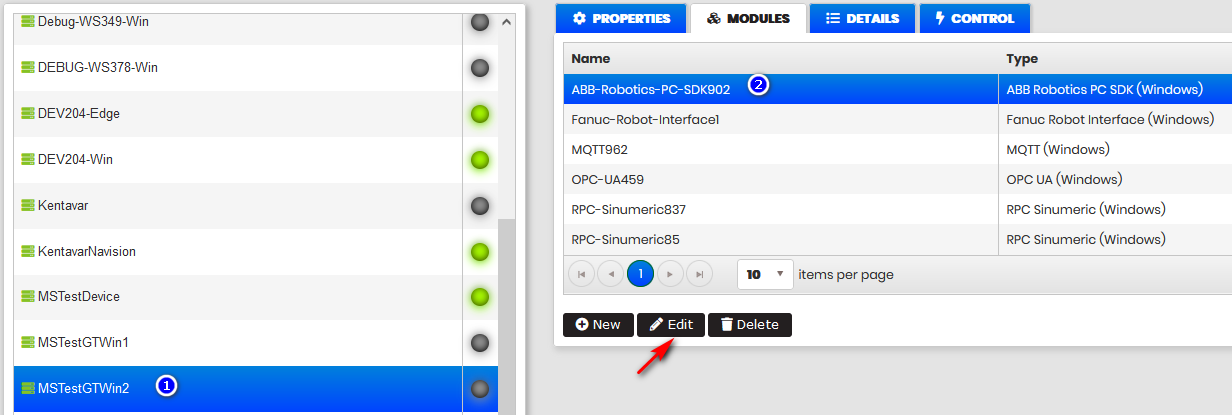
Figure 19: Gateway module with machine configuration
Click the Edit button.
- The Edit module form opens. In the module Desired configuration, the machine configuration settings data is added or updated in a JSON value.
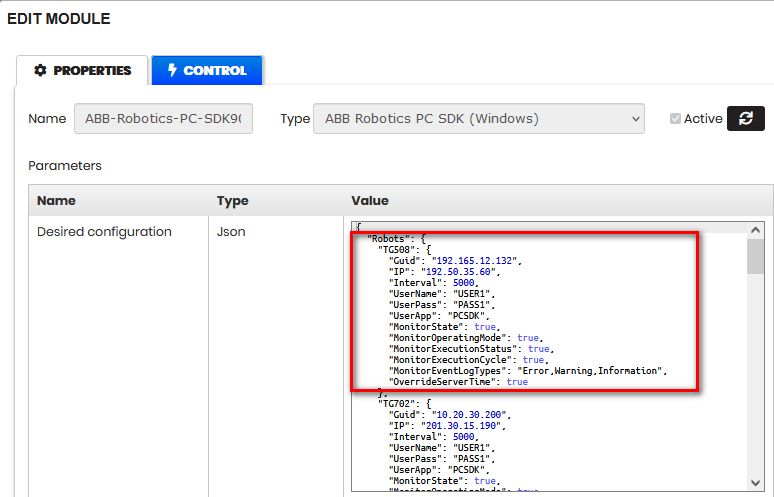
Figure 20: Gateway module with machine configuration
Note! For more details, see Adapters section.
Update Machine Properties
Precondition: The machine is configured in the organization tree.
Select the machine in the organization tree. Select tab Properties.
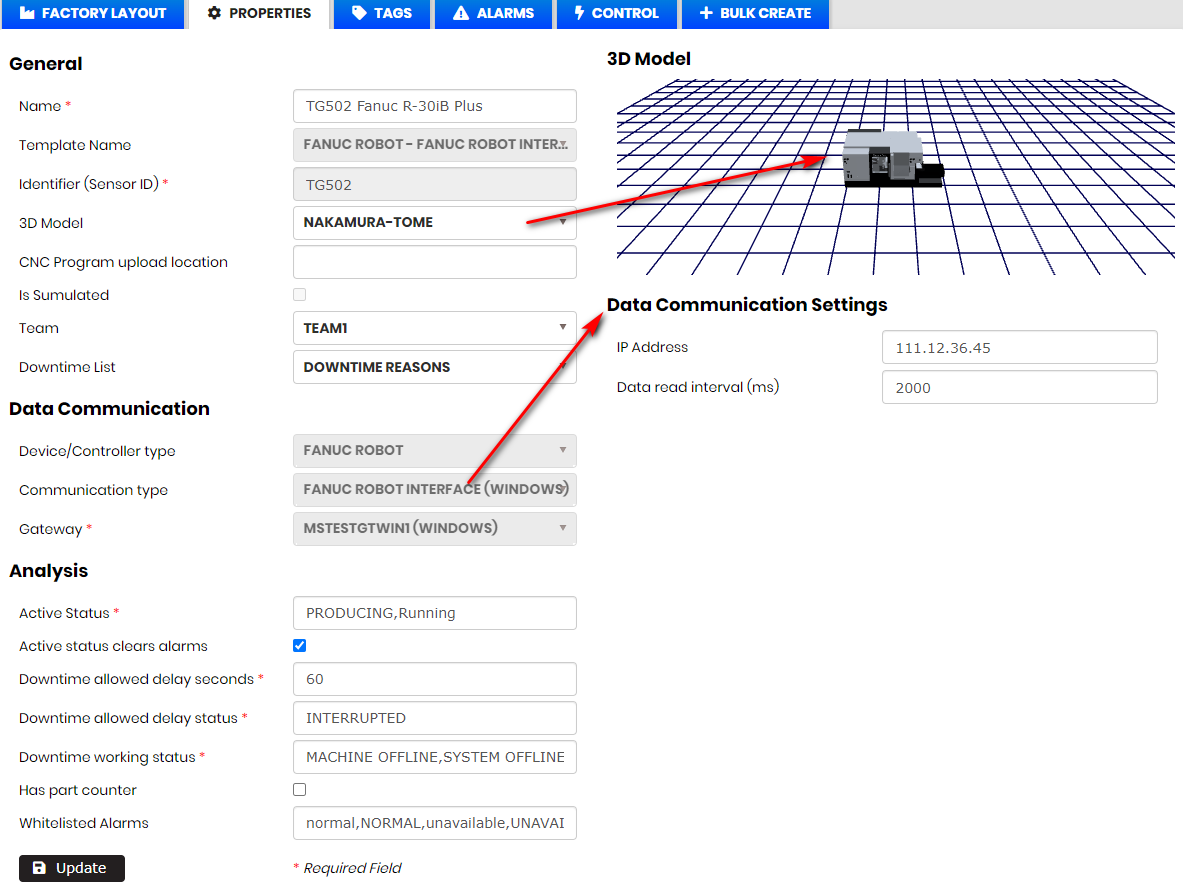
Figure 21 Update machine properties and communication settings data
The user can view or edit the editable properties. After changing some properties or data communication settings click the Update button.
- The machine properties are updated.
- The machine communication settings are sent to the gateway module for the corresponding adapter and added or updated in the JSON value of the module.