Overview
This section provides information on how to configure and use the Maintenance module in Upkip.
- Assets - add and configure assets in the company.
- Requests - submit asset maintenance request.
- Orders - create and process maintenance orders.
- Maintenance dashboard - display information about maintenance requests and orders.
Assets
Create Asset
Precondition: Select the Assets menu. Select a department in the assets tree.
Click the menu Add/Asset.
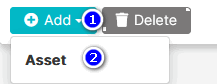
Figure 1: Select Add Asset menu
- The Add Asset form opens.
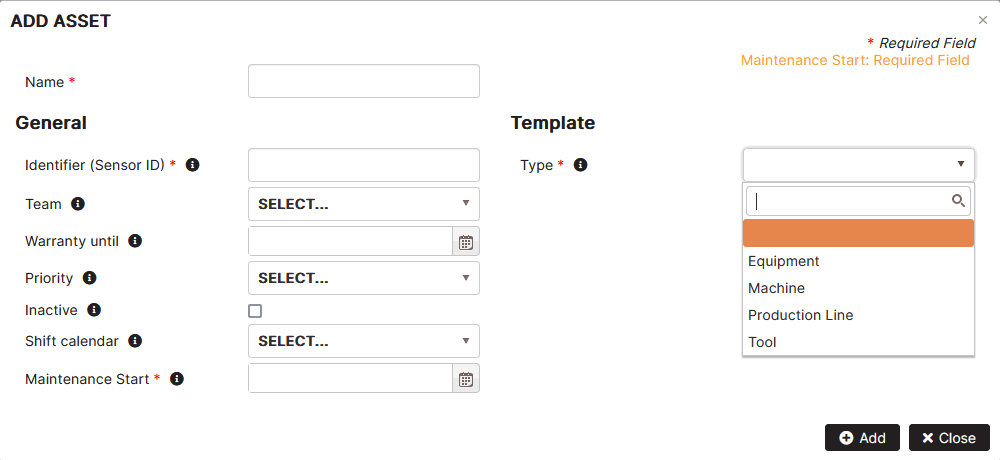
Figure 2: Add new asset
Fill in details for a new asset.
General properties
- Name – the name of the asset.
- Identifier (Sensor ID) – unique identifier of the asset
- Team – select a configured team. Used to logically group or filter assets.
- Warranty until – select a date on which the warranty expires.
- Priority – select the machine maintenance priority from the configured list.
- Inactive – check if the asset is inactive.
- Shift calendar – it is possible to select a shift template for the asset from those configured in the company.
- Maintenance start – select a date when maintenance starts.
Template
- Type – select an asset type. Each type has different maintenance-related properties.
Click the Add button.
- The machine name appears under the department in the asset tree.
Assets in the Organization tree
An asset can be added to the organization tree using the Assets menu and Add Asset, populating the asset maintenance properties. Then, in the Organization menu, the asset is displayed if the Show assets option is checked.
The other way to configure an asset is when the machine is already configured via the Organization menu, then select the Assets menu and the machine in the asset tree and update the asset maintenance properties.
In the asset tree, if a machine has a gray icon, it means that the machine has no maintenance properties defined.
Click the created asset in the organization tree. Click the Tags tab. Filter by typing the MMS.
- The group of maintenance related tags are created automatically when the asset is created.
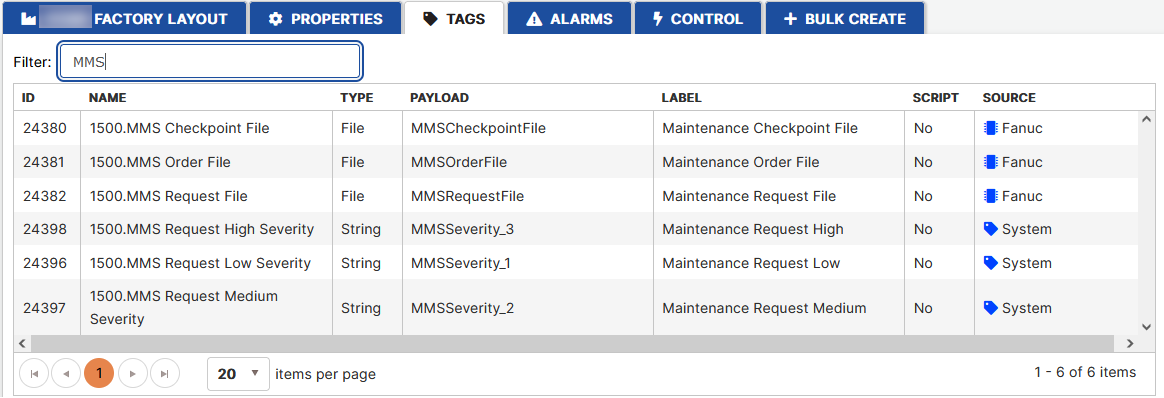
Figure 3: Asset maintenance related tags
Update Asset
Select the asset in the asset tree.
- The Properties, Counters and Checkpoints tabs are displayed on the right. Properties open by default.
Users can change the properties of the asset except the ID and type and click the Update button.
- The asset properties are updated.
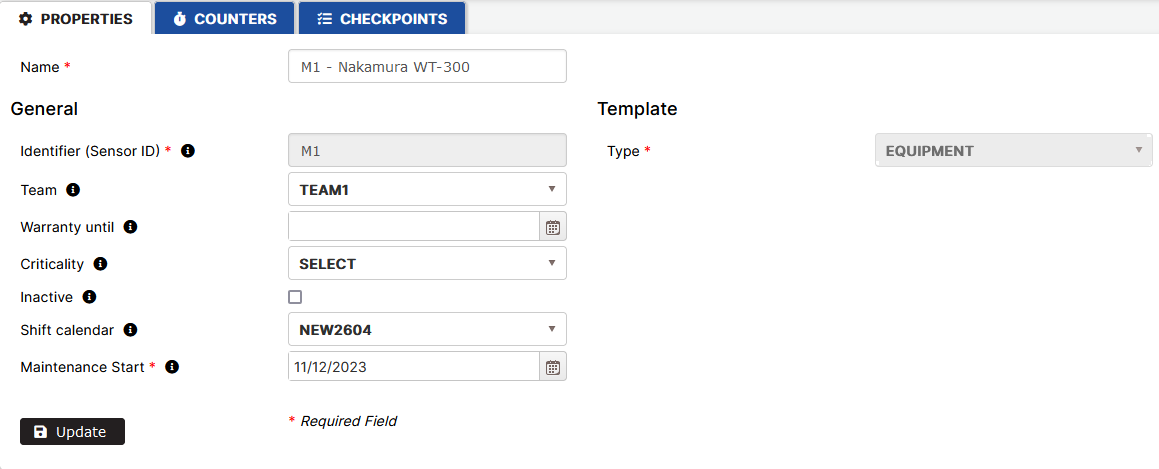
Figure 4: Update asset properties
Delete Asset
Precondition: Select the Asset menu. Select the asset in the asset tree.
Click the Delete button.
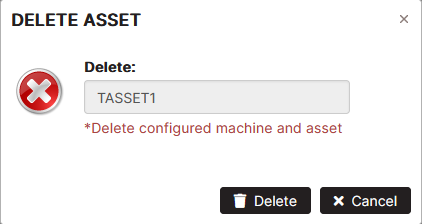
Figure 5: Delete asset
Click the Delete button again to confirm deletion.
- The asset is removed from the asset tree.
Assets List
Purpose: The asset list shows all assets in the selected department or factory.
Click the Assets menu.
- The list of company assets is displayed on the right.
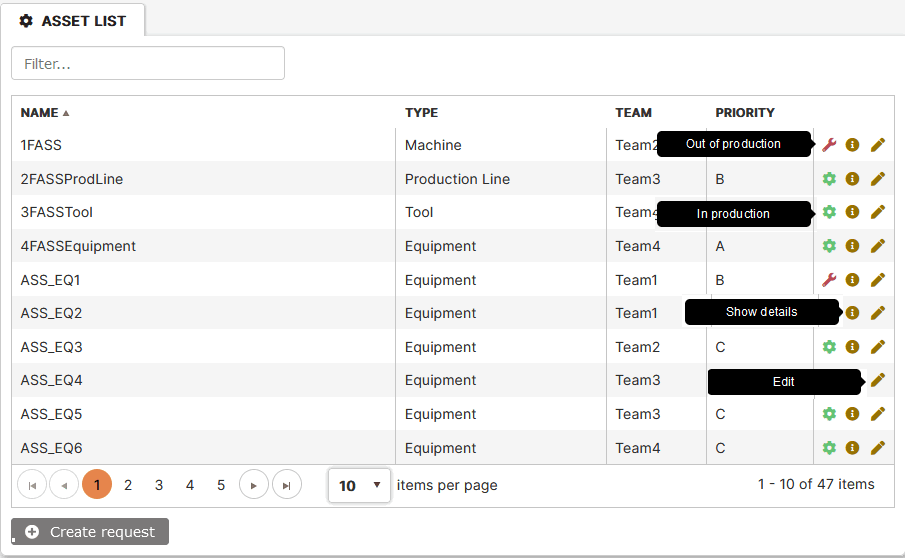
Figure 6: Asset list
The last column shows icons informing about:
- The asset state – In production or Out of production
- Clicking the edit icon or double-clicking the asset row opens the Asset Properties tab.
- Clicking the icon Show details opens the Status form.
Asset Status
Purpose: To show the 5 active orders and the last 5 of the completed orders.
The Asset status form displays two tables of active orders and completed asset maintenance orders.
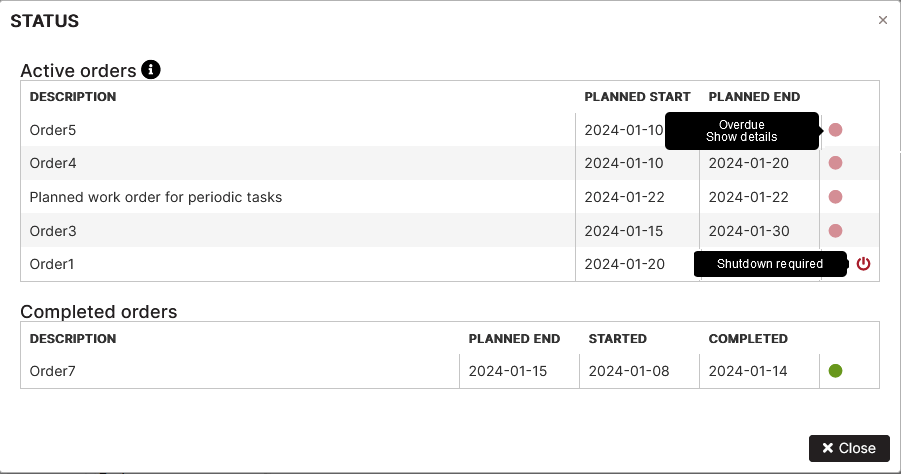
Figure 7: Asset status form
Table Active orders shows the 5 active maintenance orders with their description, planned start and planned end dates. The last column shows the statuses of the orders according to the legend and icon if the asset shut down is necessary.
Table Completed orders shows the last 5 completed maintenance orders with description, planned end, started, and completed dates. The last column shows the order status Completed or Completed with delay.
Hover your mouse over the info icon near the Active orders heading, the legend with order statuses is displayed.
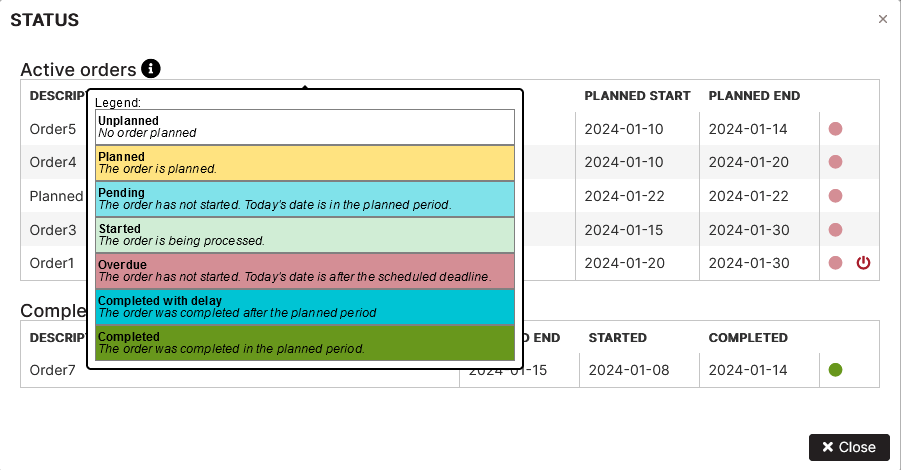
Figure 8: Legend with order statuses
Asset Counters
Purpose: To configure various types of counters on selected asset tag data.
Precondition: The asset tab Counters can be opened by:
- Select the asset in the asset organizational tree.
- Double-click the asset in the asset list.
Click the tab Counters.
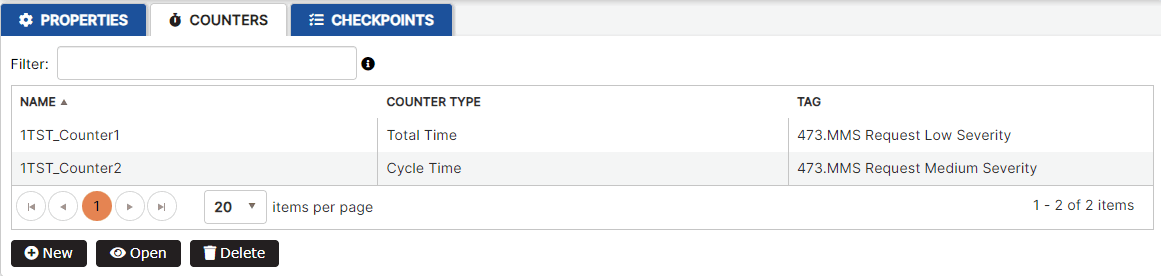
Figure 9: Asset counters list
To add a new asset counter, click the New button.
- The New counter form opens.
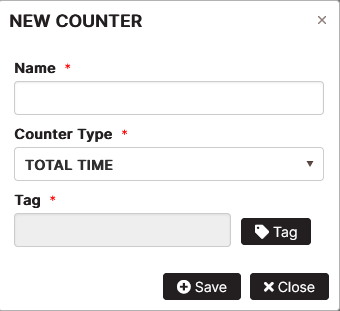
Figure 10: Add new counter for the asset
Fill in the Name, select a counter type from the list, select the tag from the list and click the Save button.
- The counter is created and appears in the list.
The counter list shows the counters created for the asset by name, counter type, and tag name.
To update the asset counter, click the counter in the list. Click the Update button.
The user can change the counter name and/or type and save it.
- The counter is updated.
To delete an asset counter, click the counter in list of asset counters. Click the Delete button. Confirm again with the Delete button.
- The asset counter is removed from the list.
Asset Checkpoints
Creating checkpoints for the asset means that these are scheduled machine maintenance tasks. Checkpoints have different types depending on the activity, outcome or how they are triggered.
Add Periodic Checkpoint
Periodic checkpoints are scheduled to inspect or replace parts of the asset during configured periods – daily, weekly, monthly, or yearly.
Precondition: Open the asset tab Checkpoints is possible by:
- Select the asset in the asset tree.
- Double-click the asset in the asset list.
Click the tab Checkpoints.
- The asset checkpoints list opens.
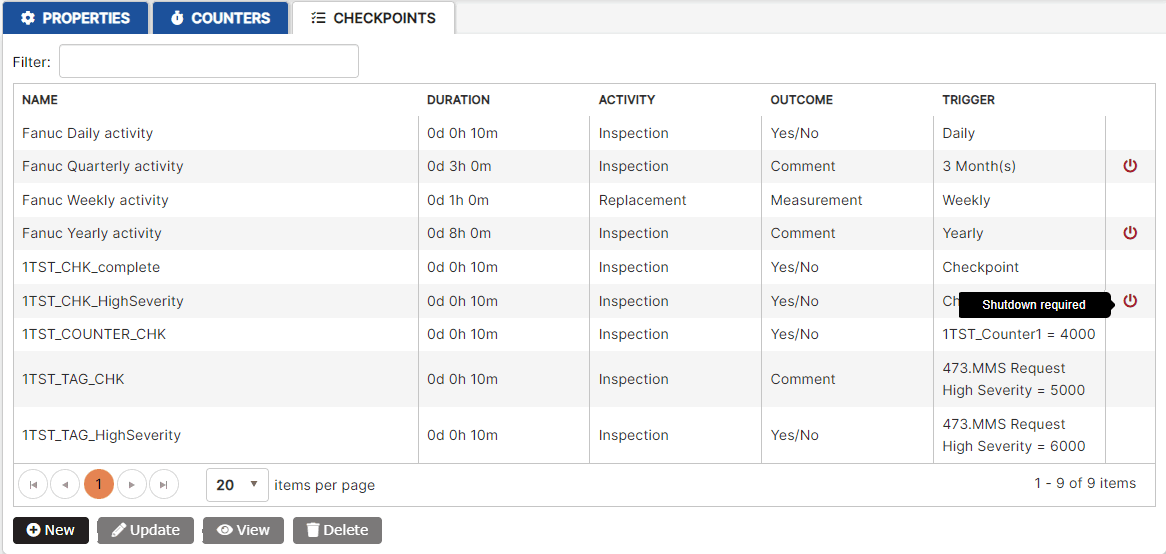
Figure 11: Asset checkpoints list
The checkpoints list displays the name, duration, activity, outcome, and trigger for each checkpoint. The last column shows an icon if asset shut down is required for the maintenance check.
To add a new asset checkpoint, click the New button.
- The Create maintenance checkpoint form opens. Advanced settings are collapsed.
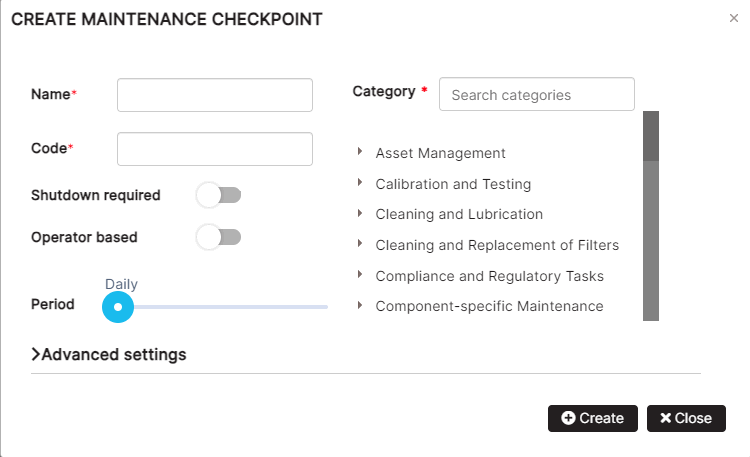
Figure 12: Create the asset maintenance checkpoint
Expand the Advanced settings to create a checkpoint.
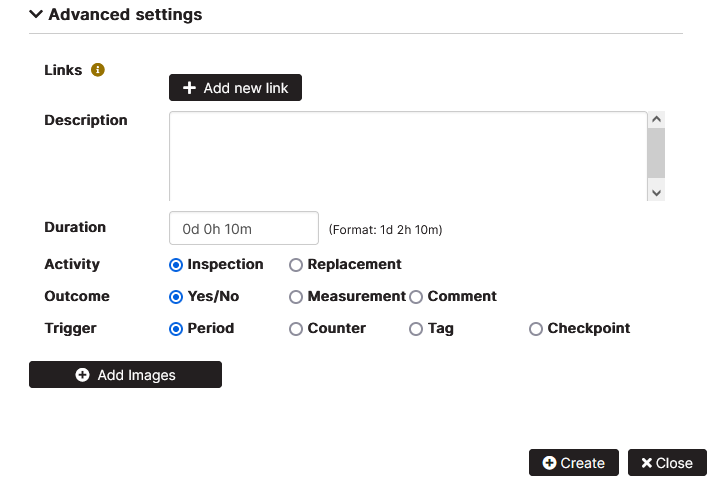
Figure 13: Asset checkpoint advanced settings
It is possible to create different checkpoints based on the selected activity, outcome, and trigger options selected.
Based on the Activity options selected, checkpoints can be performed as inspection or replacement of the asset parts.
Based on the Outcome options selected, checkpoints can be completed by selecting Yes or No, as a measurement performed or as a maintenance comment filled in.
Fill in the checkpoint’s name. The code is automatically filled in.
It is possible to turn on the option Shutdown required and Operator based.
Search by category and click a category from the list.
In the Description field, fill in details about the asset maintenance checkpoint. It is possible to add additional links to description documents.
In the Duration field, enter details about the duration of the maintenance checkpoint in days, hours, or minutes.
In the Trigger options the Period is selected by default.
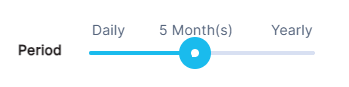
Figure 14: Periodic checkpoint period
Users can select the period by moving the slider from Daily to Weekly, X Month(s), or Yearly.
It is possible to add photos related to the checkpoint by clicking the button Add images. The added image can be downloaded, viewed in a separate tab of the browser, or deleted. It is possible to add multiple images in the checkpoint.
Click the Create button.
- A periodic checkpoint appears in the list.
Add Counter-based Checkpoint
Counter-based checkpoints are triggered when the counter rule is met.
Precondition: The asset counter is defined. See Asset Counters list. The Asset Checkpoints tab is selected.
Click the New button. Fill in the required details for name and category. Fill in duration of the checkpoint. Select the activity, and outcome option.
In the trigger section, select the Counter option.
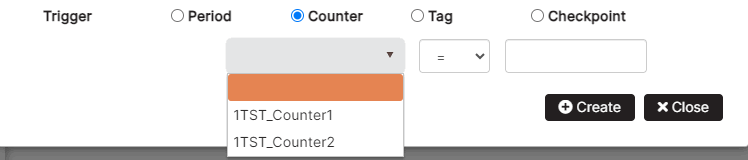
Figure 15: Create checkpoint with trigger counter
Select from the drop-down menu the counter defined for the asset, select a logical operator, and add a value. Click the Create button.
- A counter-based checkpoint appears in the list.
Add Tag-based Checkpoint
Tag-based checkpoints are triggered when the tag rule is met.
Precondition: The Asset Checkpoints tab is selected.
Click the New button. Fill in the required checkpoint details.
In the trigger section, select the Tag option.
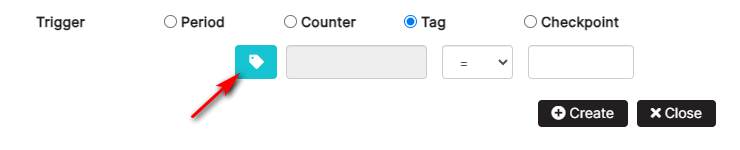
Figure 16: Create checkpoint with trigger tag
Click the icon to select a tag from the list of asset tags. Select a logical operator and add a value. Click the Create button.
- A tag-based checkpoint appears in the list.
Add Checkpoint-based Checkpoint
Checkpoint-based checkpoints are triggered when the selected checkpoint is completed.
Precondition: The Asset Checkpoints tab is selected.
Click the New button. Fill in the required checkpoint details.
In the trigger section, select the Checkpoint option.
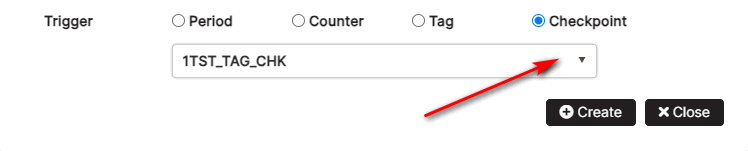
Figure 17: Create checkpoint with trigger another checkpoint completion
Select the checkpoint from the asset checkpoints drop-down list. Click the Create button.
- A checkpoint associated with the completion of the selected checkpoint appears in the list.
View Checkpoints
Purpose: Open the read-only view of the checkpoint settings.
Precondition: The asset is selected in the asset tree. The asset Checkpoints tab** is selected. The list of defined maintenance checkpoints of the asset is displayed.
Click the checkpoint from the list. The checkpoint is selected.
Click the View button.
- The Maintenance checkpoint form displays read-only checkpoint settings.
The form shows the checkpoint main settings such as name, category, shutdown required, operator base, description, duration, activity, outcome, and trigger.
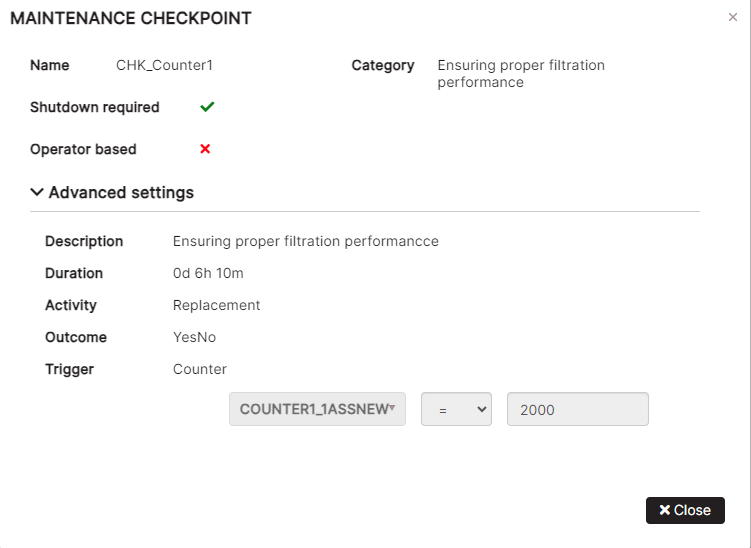
Figure 18: View maintenance checkpoint
Requests
Requests List
The Requests list shows the list of active and historical requests.
Click the Requests menu in the Maintenance section.
- The Requests page opens. There are tabs for active and completed requests.
- The Active tab opens by default.
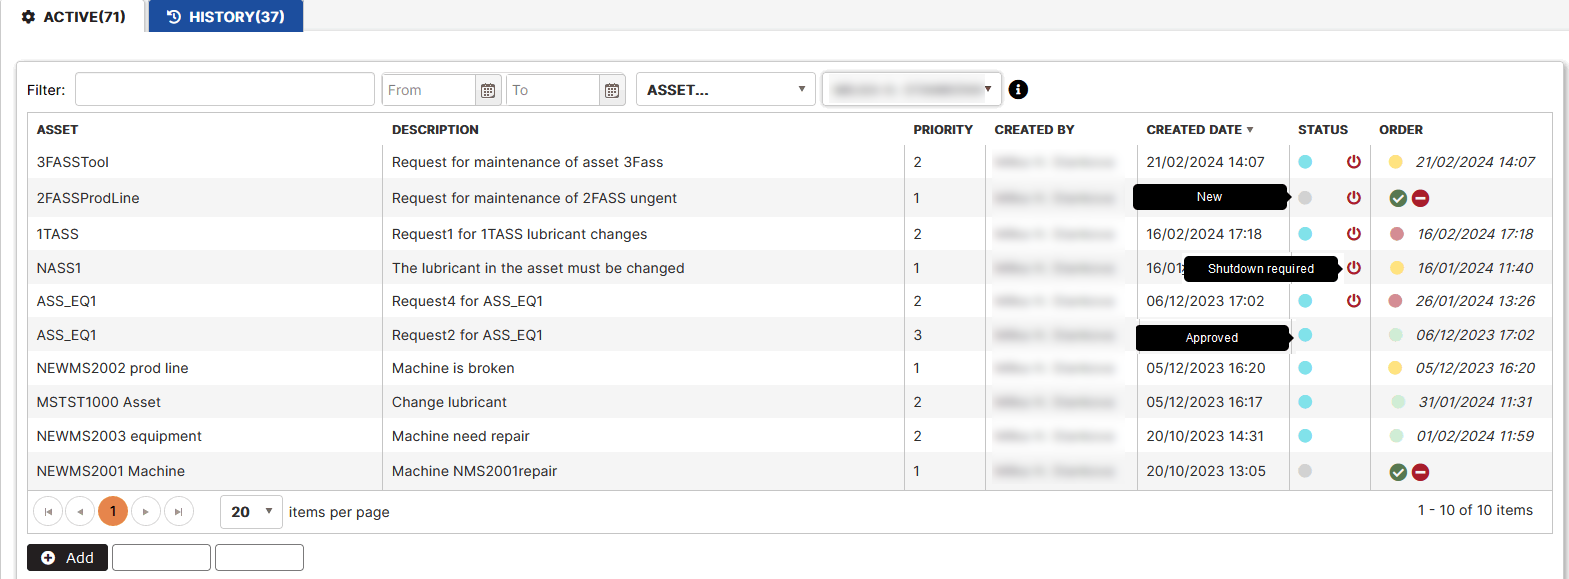
Figure 19: Requests list
The table shows the following request data.
- Asset – name of the asset.
- Description – description of the request.
- Priority – request priority.
- Created by – creator of the request.
- Created date – date of creation of the request.
- Status – column with icons.
- Request status is displayed as a circular icon with a different color described in a legend. The legend appears when you hover over the info icon. Possible request statuses are new, approved, rejected, and closed. Each has a different color.
- A Shutdown required icon** appears in the same column when maintenance requires the asset to be shut down.
- Order – status and creation date of the order from the request. The legend with the different order statuses is displayed on the Orders page.
Filter Requests List
There are various filters to filter the requests list.

Figure 20: Request list filters
- Filter by entering text in the field. The text is searched for in the asset name and request description fields. The list is automatically filtered.
- Filter by period. Select dates in the From and To fields. The requests list is automatically filtered with requests with a creation date in the selected period.
- Filter by asset. Open assets drop-down list, search and select an asset from the list. The requests list is automatically filtered to requests for the selected asset.
- Filter by request creator. Open the drop-down list of users created request. Select the user from the list. The requests list is automatically filtered to requests created by the selected user.
- Filter by request status. Possible statuses of active requests are new and approved. The requests list is automatically filtered to requests with the selected status.
Click the History tab.
- The list of completed or rejected requests opens.
The Closed Date column displays the date and time the request was closed.
It is possible to use the same filters as in the list of active requests. Possible statuses of history requests are closed and rejected.
Requests Statuses
Precondition: The Requests page is opened.
Possible request statuses with their colors are listed in the legend displayed when hovering over the info icon to the right of the status filter.
The request status can be: New, Approved, Rejected, or Closed.
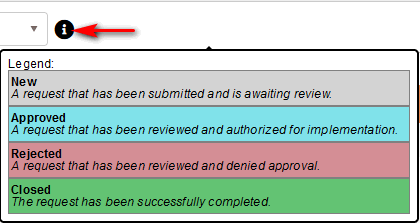
Figure 21: Legend with request statuses
Create Request without Automatic Order
Company configuration to disable automatic order creation from request
At the company level, there is an option to automatically generate work orders for created requests.
Precondition: The company is opened in Upkip Administration.
Click the edit icon from the top right side.

Figure 22: Edit organization icon
- The Edit Organization form opens.
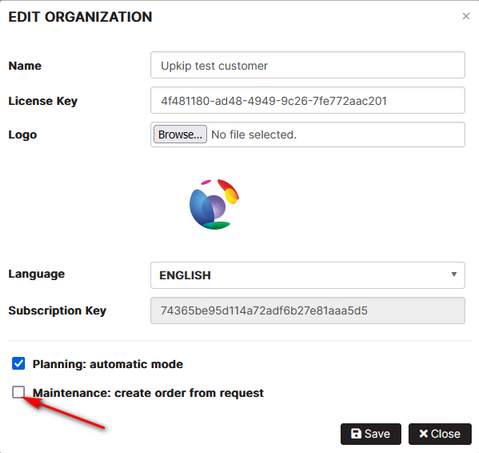
Figure 23: Edit organization – disable automatic order creation from request
Uncheck the option Maintenance: create order from request. Click the Save button.
- When creating a request, a work order will not be created automatically.
Create New Request
Precondition: The Requests page is opened.
Click the Add button.
- Create new request form opens.
!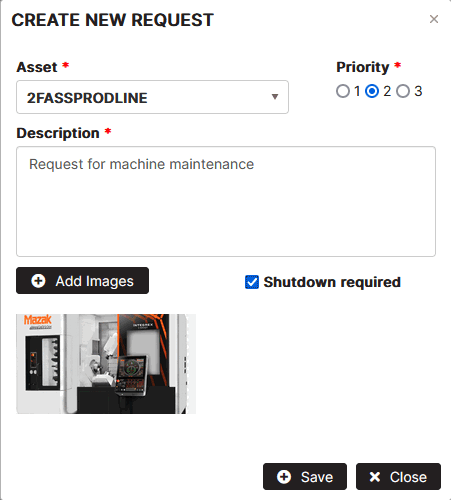
Figure 24: Create new request
Fill in details for a new maintenance request.
- Asset – select the asset from the asset list.
- Description – request description.
- Priority – select the request priority.
- Images – it is possible to attach the pictures(s) to the request.
- Shutdown required – check the option if maintenance requires the machine to be shut down.
Click the Save button.
- The request appears at the top of the requests list. The request status is New.

Figure 25: Request without automatic work order
In the last column Order, two icons are displayed for approving or rejecting the request.
Approve Request
Precondition: A request has been submitted without automatic order creation.
The Active requests tab is selected. Click on the Approve request icon.

Figure 26: Request list - click approve request icon
- The wizard Create New Order opens. Go to Create work order.
Approve request from Edit request form.
Precondition: A request has been submitted without automatic order creation. The request list is opened.
Double-click the request from the list.
- The Edit request form opens.
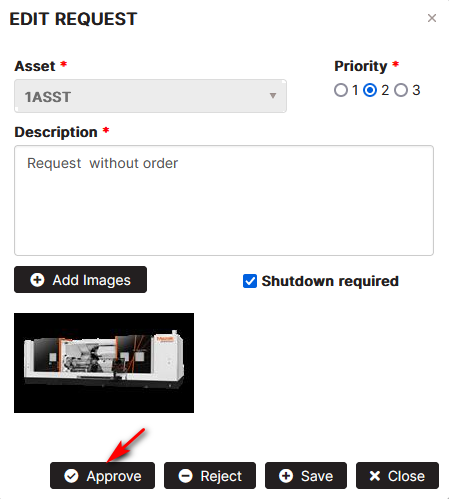
Figure 27: Approve request from Edit request form
Click the Approve request button.
- The wizard Create New Order opens. Go to Create work order.
Reject Request
Precondition: A request has been submitted without automatic order creation.
The Active requests tab is selected. Click on the Reject request icon.

Figure 28: Request list - click reject request icon
Click OK to confirm the rejection.
- The request is moved to the History list.
Click the History requests tab.
- The rejected request is visible at the top of the list.
- The Closed Date column shows the date and time the request was closed.

Figure 29: Requests history list with rejected request
Reject request from Edit request form.
Precondition: A request has been submitted without automatic order creation. The request list is opened.
Double-click the request from the list.
- The Edit request form opens.
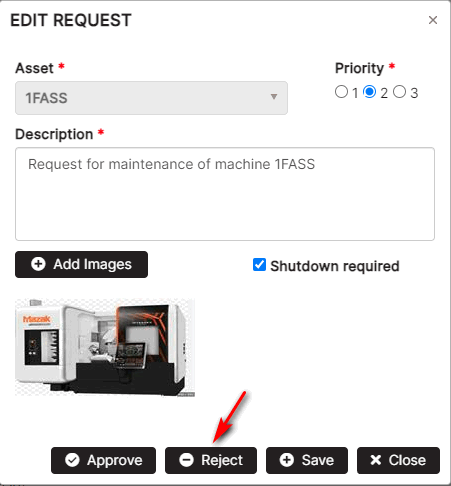
Figure 30: Reject request from Edit request form
Click the Reject button and confirm with OK.
- The request is moved to the History list.
Click the History requests tab.
- The rejected request is visible at the top of the list.
- The Closed Date column shows the date and time the request was closed.
Create Request with Automatic Order
Company configuration to enable automatic order creation from request
Click the edit icon from the top right side.
- The Edit Organization form opens.
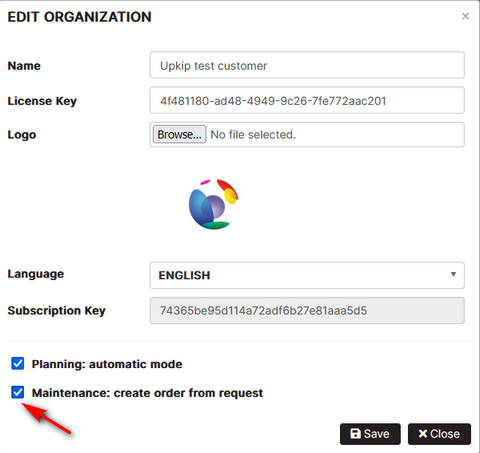
Figure 31: Edit organization – enable automatic order creation from request
Check the option Maintenance: create order from request. Click the Save button.
- When creating a request, a work order will be created automatically.
Precondition: The Requests page is opened. The Active requests tab is selected.
Click the Add button.
- Create new request form opens.
Fill in details for a new maintenance request. To view the required data for a new request, go to Create Request without Automatic Order.
Click the Save button.
- The request appears at the top of the requests list. Request status is Approved.
- The status and date and time of an automatically created order appear in the Order column.
- The order status is Unplanned.

Figure 32: Request with work order automatically created
Click the order status icon to schedule the order.
- The Maintenance Order wizard opens. Go to Plan Order.
Create Request for Asset
Create a request for the selected asset from the asset list
Precondition: The factory or department is selected. Click the Asset List tab.
- The list of assets in the department or factory is displayed on the right side.
Select the asset from the list of assets. Click the Create Request button.
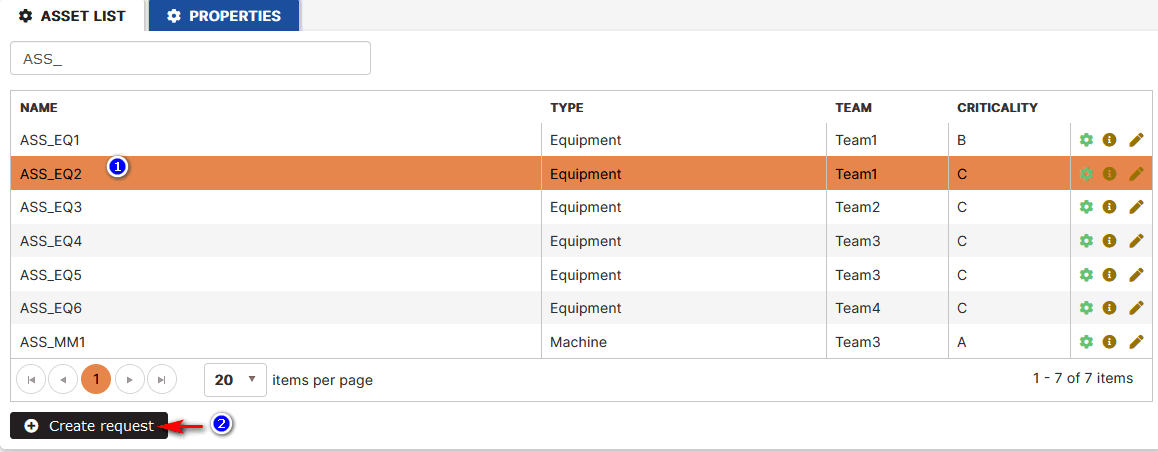
Figure 33: Create request for asset from the asset list
- The New request form opens.
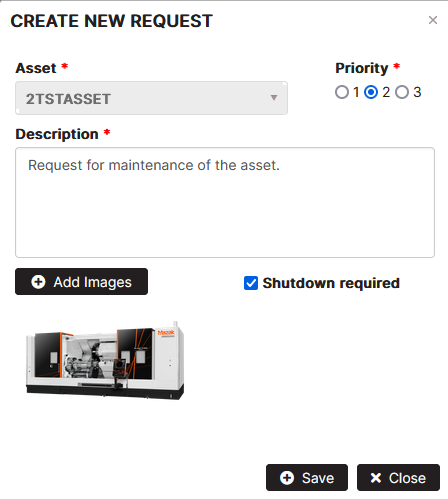
Figure 34: Create request for the selected asset
Fill in details for a new maintenance request. To view the required data for a new request, go to Create Request without Automatic Order.
Click the Save button. Click the menu Requests.
- The created request appears at the top of the requests list.
Automatic order creation depends on the company option.
- To view details about automatic order creation, go to Create Request with Automatic Order.
- To view details without automatic order creation, go to Create Request without Automatic Order.
Create a request for the selected asset in the asset tree
Precondition: The asset is selected in the asset tree. The asset properties, counters, and checkpoints tabs appear on the right side.
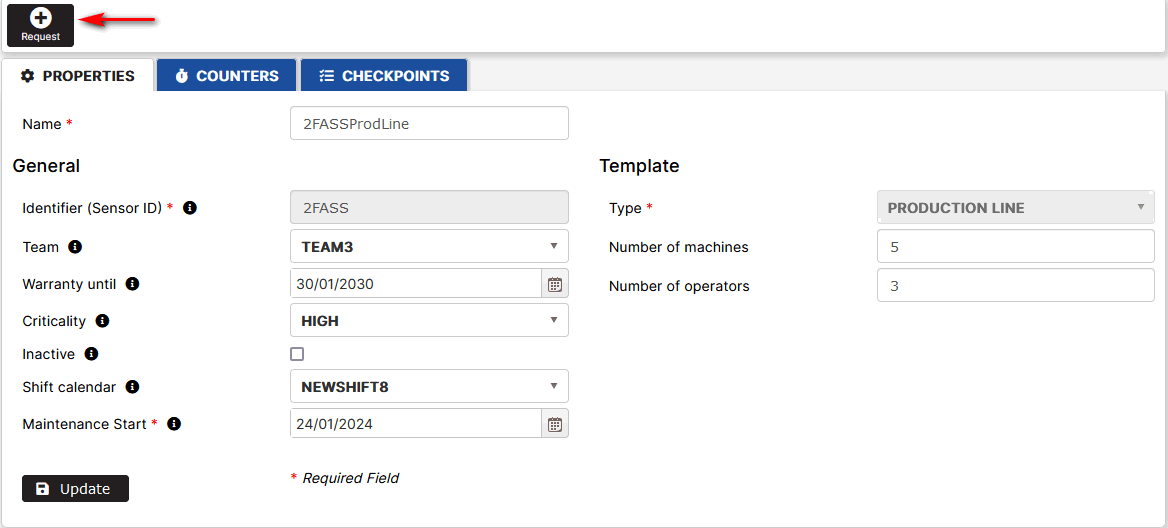
Figure 35: Create request for the selected asset in the asset tree
Click the Request button.
- The New request form opens.
- Fill in details for a new maintenance request. To view the required data for a new request, go to Create Request without Automatic Order.
Click the Save button. Click the menu Requests.
- The created request appears at the top of the requests list.
Automatic order creation depends on the company option.
- To view details about automatic order creation, go to Create Request with Automatic Order.
- To view details without automatic order creation, go to Create Request without Automatic Order.
Edit Request
Precondition: The Request page is opened.
The request can be updated by:
- Select from the list and click the Update button or
- Double-click the request line from the list.
- The Edit Request form opens.
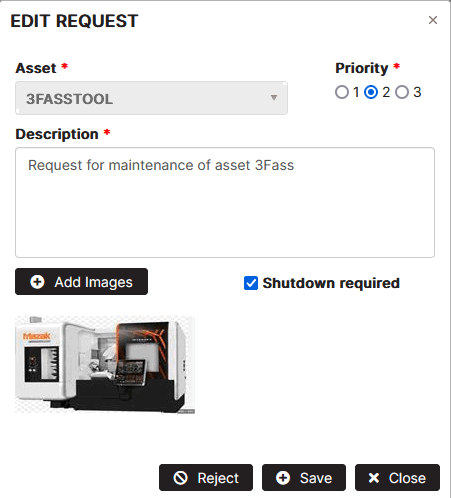
Figure 36: Edit request
The user can change all data in the request except the asset. The user can add new, view, download or delete the images in the request.
Click the Save button.
- The request is updated.
Orders
Orders List
The Orders list shows the list of active and historical orders.
Click the Orders menu in the Maintenance section.
- The Orders page opens.
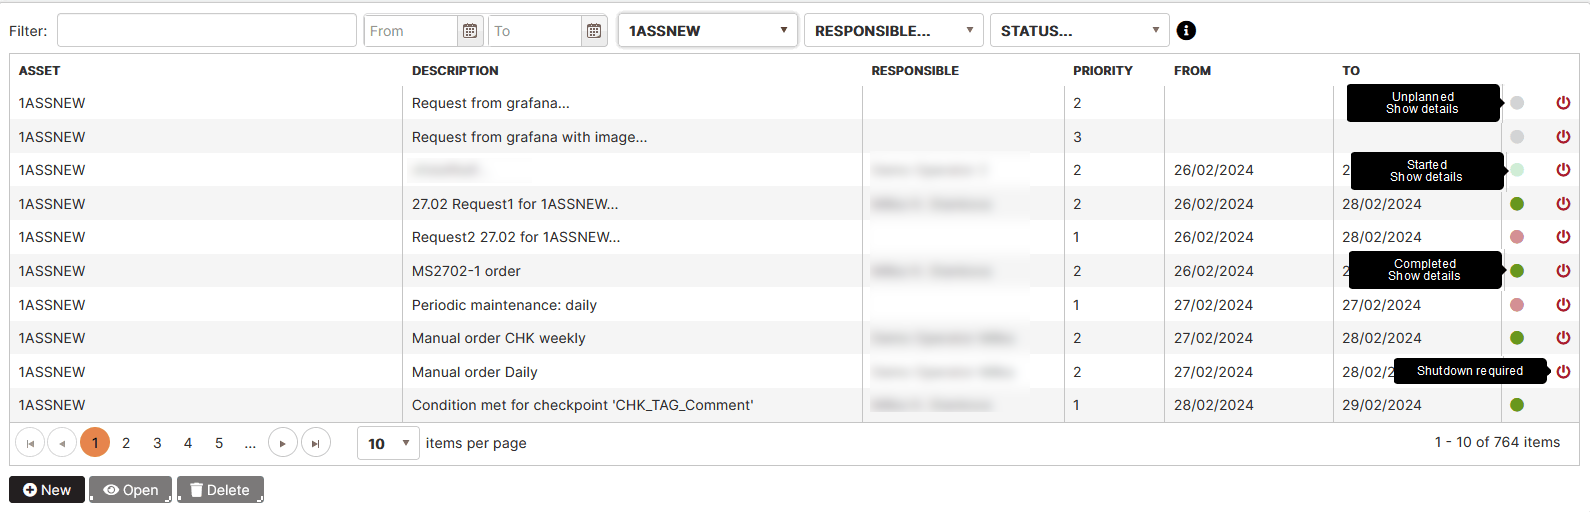
Figure 37: Orders List
The table shows the following order data.
- Asset – name of the asset.
- Description – short description of the order.
- Responsible – the person responsible for the order.
- Priority – the order priority.
- From – the order planned start date.
- To – the order planned end date.
- Status – column with icons.
- Order status is displayed as a circular icon with different color described in a legend. The legend appears when you hover over the info icon. Possible order statuses are unplanned, planned, pending, started, overdue, completed with delay, and completed. Each has a different color.
- A Shutdown required icon** appears in the same column when maintenance requires the asset to be shut down.
Filter Orders List
There are various filters to filter the orders list.

Figure 38: Orders list filters
- Filter by entering text in the field. The text is searched for in the asset name and order description fields. The list is automatically filtered.
- Filter by period. Select dates in the From and To fields. The orders list is automatically filtered with orders with a planned period that has an overlapping area with the selected period.
- Filter by asset. Open the assets drop-down list, search and select an asset from the list. The orders list is automatically filtered to orders for the selected asset.
- Filter by order responsible. Open the drop-down list of users responsible for the already created orders. Select the user from the list. The orders list is automatically filtered to orders with the responsible selected user.
- Filter by order status. Possible order statuses are displayed in the drop-down list. The orders list is automatically filtered to orders with the selected status.
Order Statuses
Precondition: The Orders page is opened.
Possible order statuses with their colors are listed in the legend displayed when hovering over the info icon to the right of the status filter.
The status of the order can be: Unplanned, Planned, Pending, Started, Overdue, Completed with delay, or Completed.
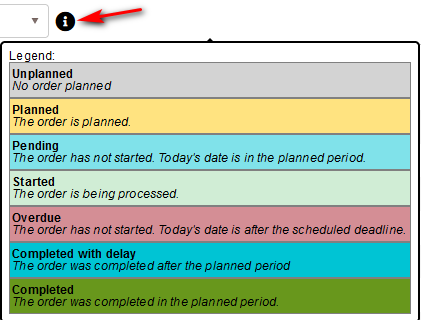
Figure 39: Legend with order statuses
Create Work Order
Precondition: Click the menu Orders in the Maintenance section. The Orders page opens.
Click the New button.
- The Create new order form opens.
- The Details tab of the form is opened default.
Order Details
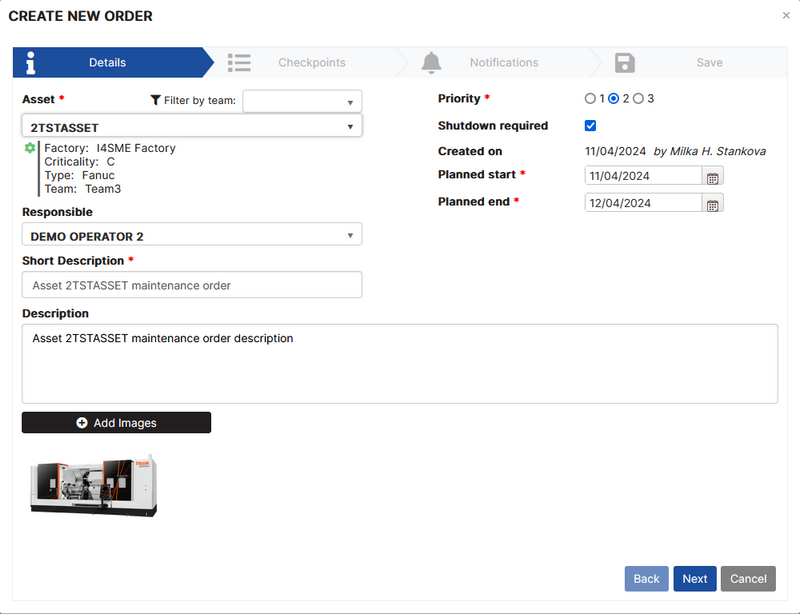
Figure 40: Order Details
Fill in the following order details.
- Asset – select the asset from the list. It is possible to filter the asset list by team or search the asset by typing text in the search field.
- After selecting the asset, its details are displayed as factory, criticality, type, and team.
- Responsible – select a responsible user from the list.
- Short Description – enter a short description of the order.
- Description – enter a more detailed description of the order.
- Images – add one or more maintenance related asset images.
- Priority – Select the order priority (1,2, or 3).
- Shutdown required – check the option if maintenance requires the machine to shut down.
- Planned start – select the order planned start date.
- Planned end – select the order planned end date.
Click the Next button.
- The Checkpoints tab of the form opens.
Order Checkpoints
Purpose: Configure the checkpoints to be executed in the order.
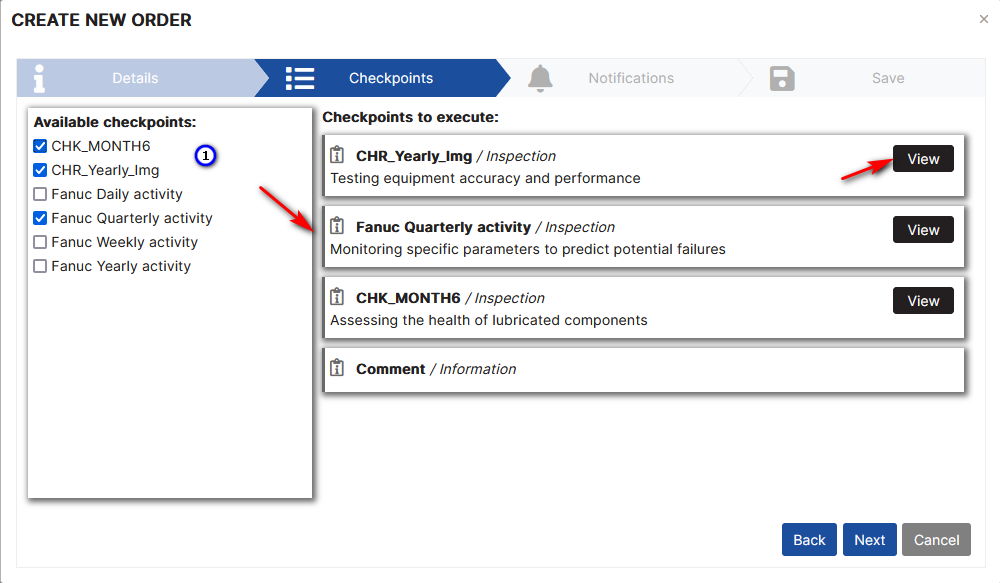
Figure 41: Order Checkpoints
The available checkpoints for the asset are displayed on the left side of the form.
The user clicks on a checkpoint to be included in the order. It is possible to select multiple checkpoints.
- On the right side of the form, fill-in fields with the results of the checkpoints execution are displayed.
- The field for final comments on the order execution is also displayed.
For each checkpoint appears the View button. Clicking the View button opens the maintenance checkpoint view form.
Click the Next button.
- The Notifications tab of the form opens.
Order Notifications
Purpose: Configure users to be notified of order fulfillment steps. Notifications are by sending emails to users.
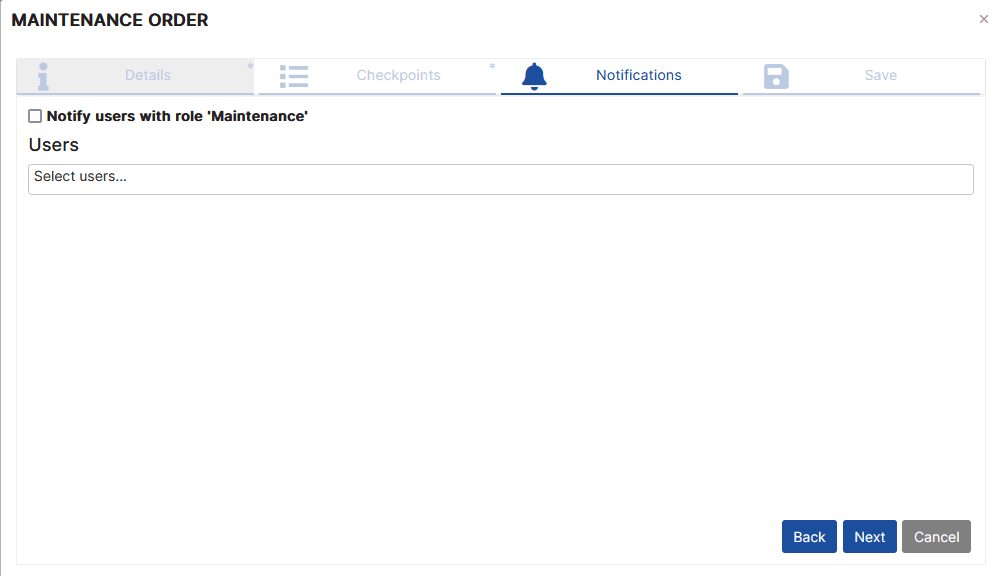
Figure 42: Order Notifications
Check the option Notify users with role Maintenance. This is optional.
- All users with Maintenance role in the company will receive an email for each step of order fulfillment.
Open the drop-down list users and select users to be notified for order fulfillment. The selected users will receive an email for each step of order fulfillment.
For details on notification emails, go to Order Notifications.
Click the Next button.
- The Review tab of the form opens.
Order Review
Purpose: All order settings are displayed for review.
If the user wants to change some settings, click the Back button, and go back to the previous Notification, Checkpoints, or Details steps.
Click the Finish button.
- The order is created and added to the orders list.
- The created order has the status Planned.
To find the created order, use filters from the orders list. For details go to Filter Orders List.
Plan Order
Precondition: After submitting a request, the order is automatically created with the status Unplanned.
For details go to Create Request with Automatic Order.

Figure 43: Request with the automatically created order
Click on the order status icon.
- Maintenance order form opens. Tab Details is selected.
- Request details are displayed.
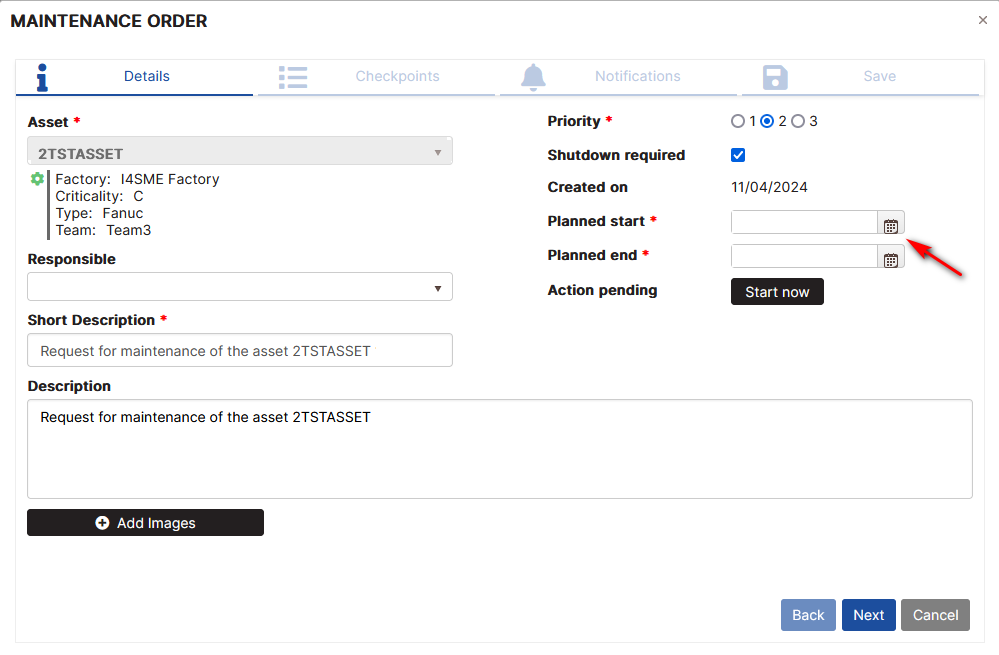
Figure 44: Plan maintenance order
Select planned start and planned end date. It is possible to add pictures of the machine.
Click the Next button.
- The Checkpoints tab opens.
- For details on how to configure checkpoints, go to Asset Checkpoints.
Click the Next button.
- The Notifications tab opens.
- For details on how to configure notifications, go to Order Notifications.
Click the Next button.
- The Order Review tab opens.
Click the Finish button to save the order.
- The order status is changed to Planned.
Change Orders Statuses
The order status can be changed manually following the order status workflow.
Select the Orders menu.
- The list of created orders is displayed. Each order has a status.
Unplanned to Planned
When an order is automatically created from the request, it has a status Unplanned.
Click on the order status icon from the requests list or click on the order status icon from the orders list.
- For details on how to schedule unplanned order, go to Plan Order.
- After planning, the order has the status Planned.
When the order is scheduled, and the current day is within the scheduled period of the order, but the order has not yet started.
- The order gets a status Pending.
For details on possible order statuses, go to Order Statuses.
Planned to Started
Precondition: The order is scheduled and has a status Planned.
Click on the order status icon from the requests list or click on the order status icon from the orders list.
- The maintenance order checkpoints tab opens.
Click the Details tab. Click the button Start now.
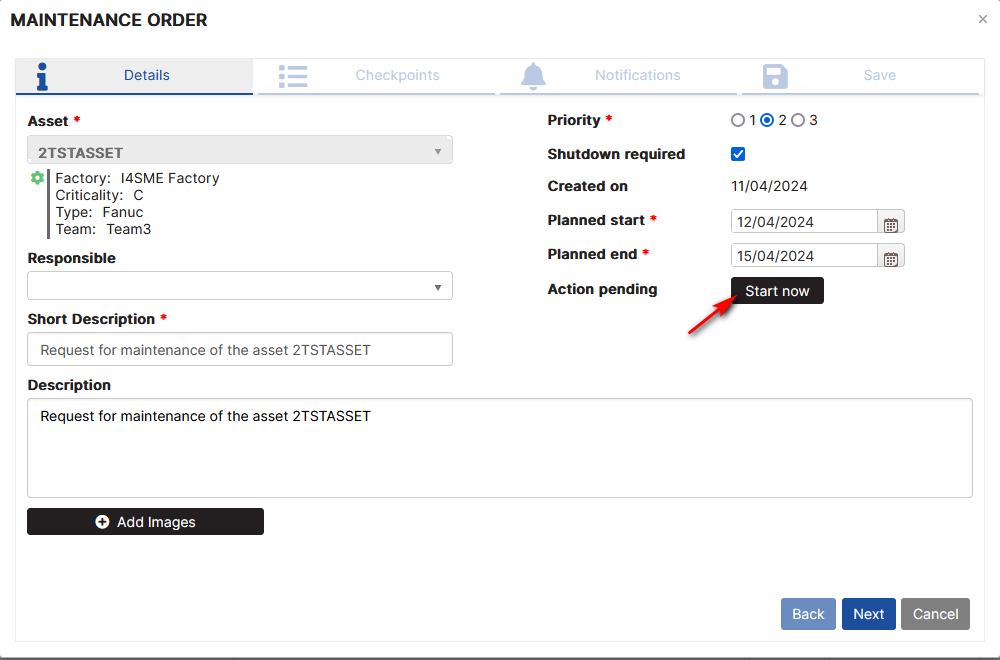
Figure 45: Start the order manually
Click the Next button to proceed to the Review step. Click the Finish button to save the order.
- The order gets a status Started, colored according to the legend of the order statuses.
When the order is scheduled but the current date is after the order’s planned end date.
- The order is assigned an Overdue status, colored according to the legend of the order statuses.
For details on possible order statuses, go to Order Statuses.
Started to Completed
Precondition: The order is started and has a status Started.
Click on the order status icon from the requests list or click on the order status icon from the orders list.
- The maintenance order checkpoints tab opens.
Fill in the results of the checkpoints execution. Click on the order Details tab.
- Completion of the order is allowed, Complete now button is enabled.
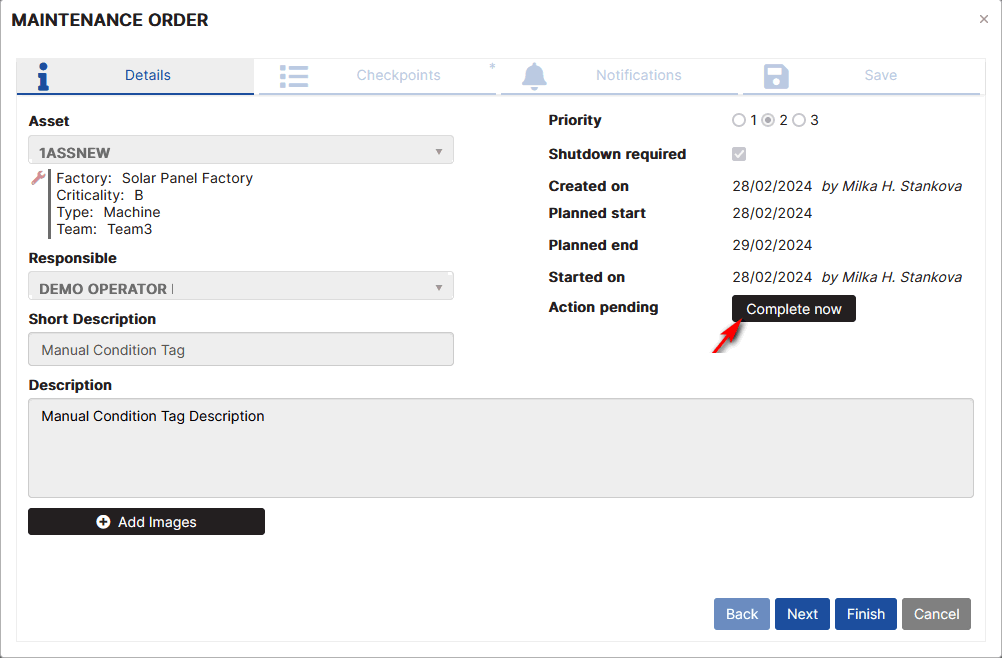
Figure 46: Complete maintenance order
Click the Complete now button.
- The order gets a status Completed when the current date is within the planned period.
- OR the orders get a status Completed with delay when current date is outside the order’s planned period.
For details on possible order statuses, go to Order Statuses.
Orders notifications
Precondition: The order is scheduled.
The responsible user starts the order. For details on how to start the order, go to Planned to Started.
Users configured to receive emails on order status changes receive the email.
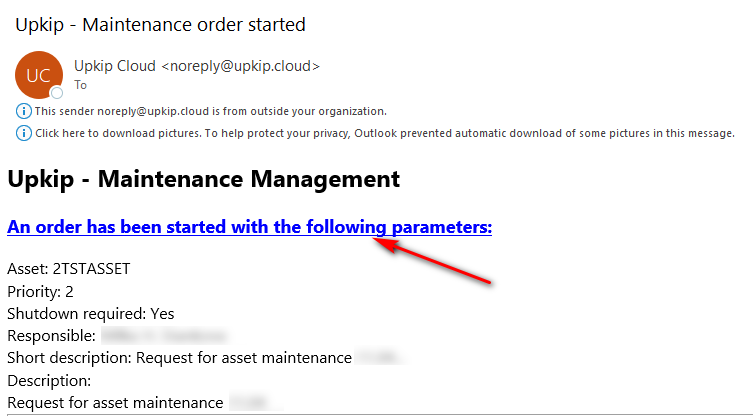
Figure 47: Maintenance order started email
Click the link from the email.
- The order form with Details and Checkpoints tabs opens in the browser.
The user can view details and fill in the results of the order checkpoints. After filling in the results of the checkpoints and the final results of the order, the user can complete the order.
For details on how to complete the order, go to Started to Completed.
When the order is completed, the configured users receive the email.
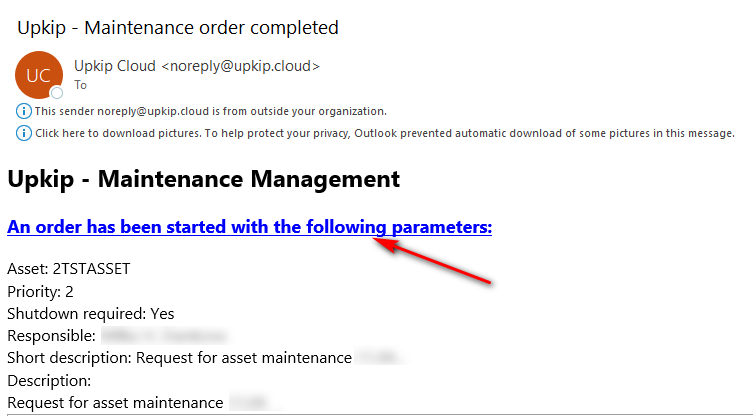
Figure 48: Maintenance order completed email
By clicking on the email link, users can only see the order details and checkpoints fulfillment.
Automatic orders generation from checkpoints
Periodic orders generation
Precondition: A period analyzer has been developed that runs every one hour.
The analyzer analyzes checkpoints that are triggered periodically. For details on how to configure, go to Add Periodic Checkpoints.
- Daily checkpoints – if checkpoints are triggered daily, it generates maintenance orders for each day for a year ahead.
- Weekly checkpoints - if checkpoints are triggered weekly, it generates maintenance orders for each week for a year ahead.
- Month(s) checkpoints - if checkpoints are triggered monthly or in a certain number of months, it generates maintenance orders for each period for one year ahead.
- Annual checkpoints - if the checkpoints are triggered annually, one order is generated for one year ahead.
The generated periodic order has in description Periodic maintenance:, followed by the period daily, weekly, monthly, or yearly.
The status of the generated orders is Planned.
Condition orders generation
Precondition: A period analyzer has been developed, that runs every 12 minutes.
The analyzer analyzes checkpoints that are conditionally triggered.
The conditional checkpoints can be counter-based. For details on how to configure, go to Add Counter-based Checkpoints.
The conditional checkpoints can be tag-based. For details on how to configure, go to Add Tag-based Checkpoints.
The conditional checkpoints can be checkpoint-based. For details on how to configure, go to Add Checkpoint-based Checkpoints.
If the checkpoint condition is met, an order is created with the description Condition met for checkpoint <checkpoint name> or Condition met for checkpoints.
The status of the generated orders is Planned.
Schedule
Select the Schedule menu under the Maintenance menu.
- A summary page with orders by asset is displayed.
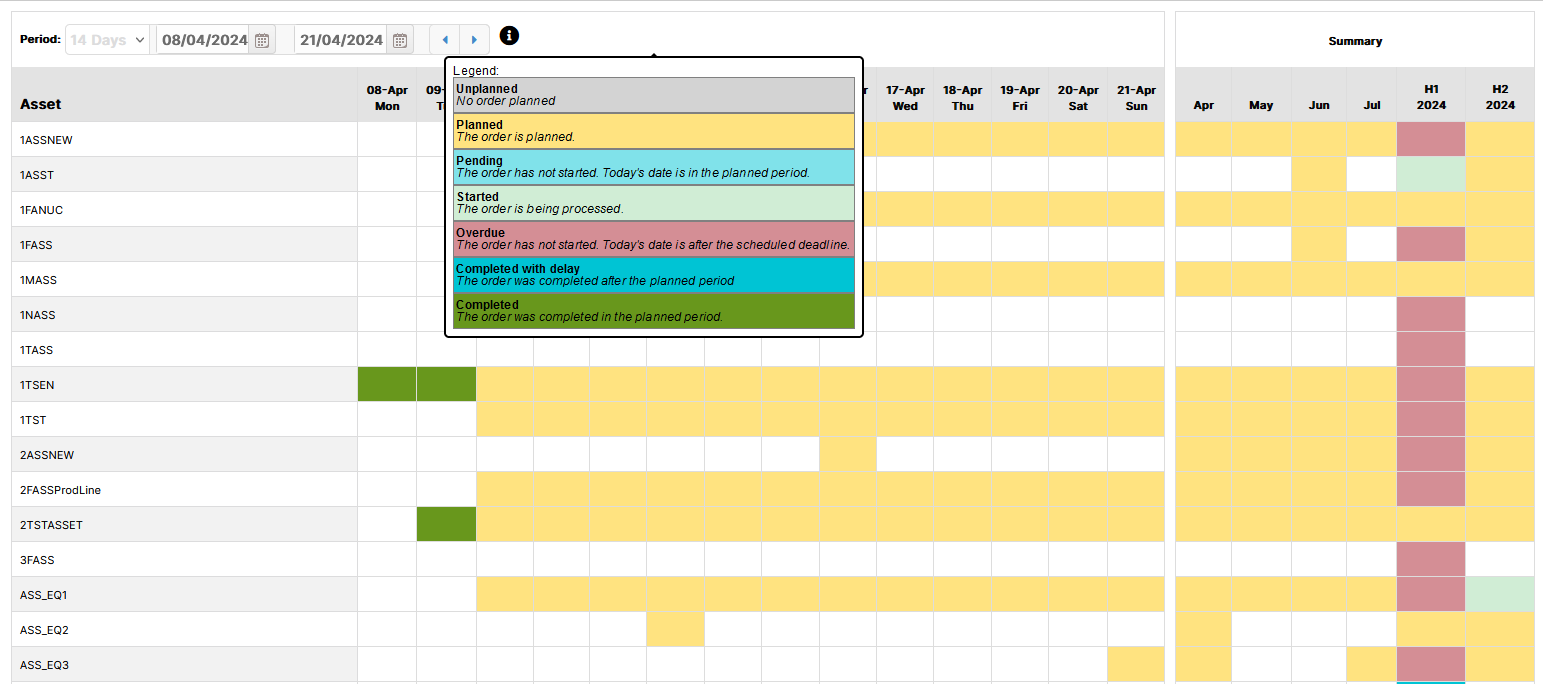
Figure 49: Orders schedule for a period
The period can be moved back or forward by a two-week period, showing relevant order statuses per asset.
For each day of the two-week period, by asset, orders are presented in colored cells with the color of the higher priority order status for a day.
Тhe summary section presents a higher priority order status for:
- The next four months cell staining for each month.
- For the first and second half of the year, cell staining for both.
Order statuses are ordered in descending order of priority: overdue, started, pending, planned, completed with delay, and completed.
The cell is colored with the color of the higher priority status of the asset orders.