Events
Purpose: Various events cab be created in the Upkip Administration. They are built with a specially designed expressive language that supports a limited number of operations and functions. The event is fired when the expression defined in it returns true. Events trigger alerts and notifications.
The section describes:
- Create new event
- Create events and warnings from tag limits
- Delete events and warnings from tag limits
Create new event
Precondition: The user with the role Administrator is logged into the Upkip Administration.
Select the menu Data/Events.
-
The Events page opens.
-
The table displays events by name and expression.
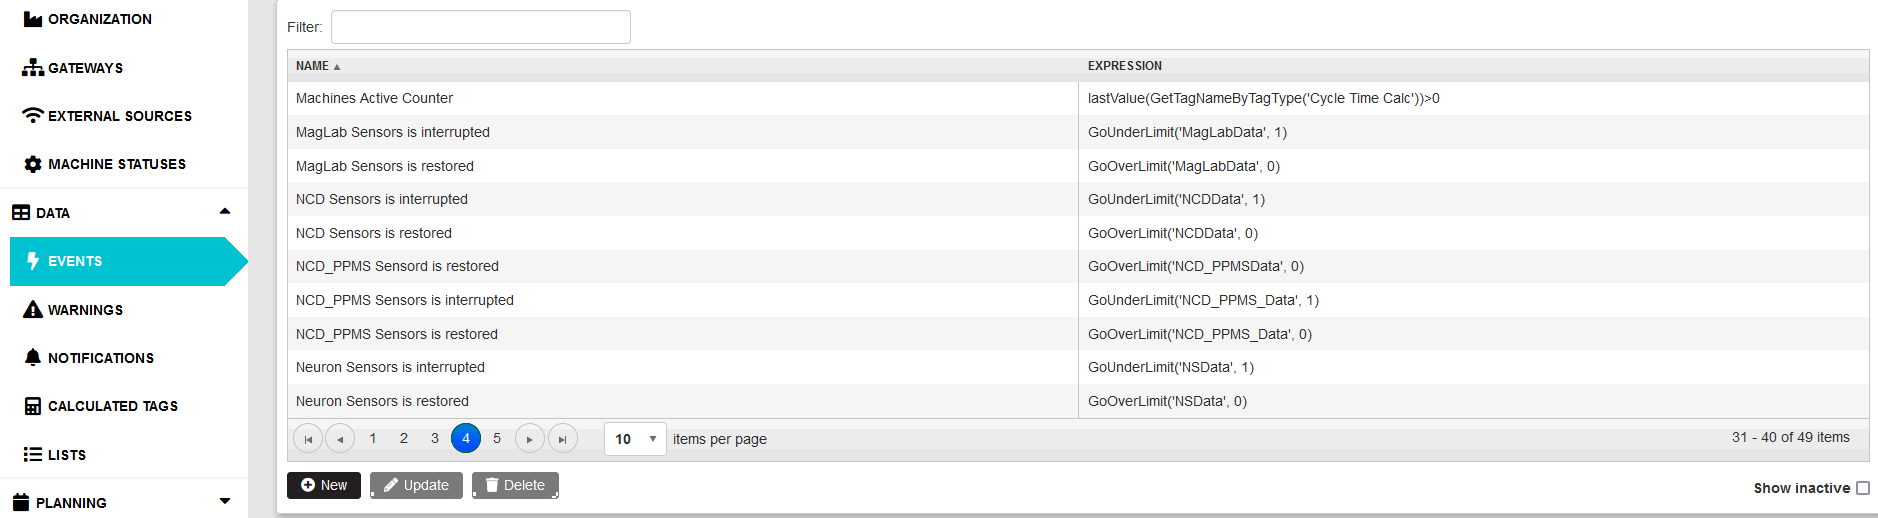
Figure 1: Events list
Click the New button to create a new event.
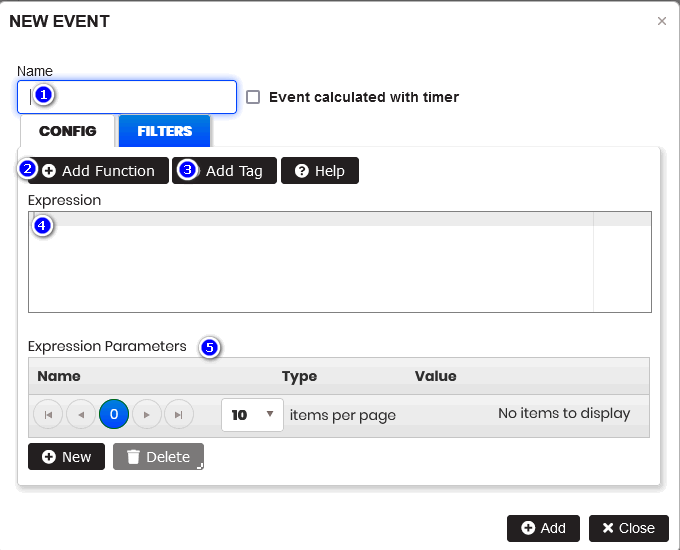
Figure 2: Events - New event
Fill in the details:
- Name of the event (1).
- Expression of the event (4). Expressions are defined by using a function from Add Function(2) and tags from Add Tag(3)
- Some operators are used to create an expression:
- Math operations: -, +, *, /, ^, sqr
- Logical operations: Use & or |
- Comparison operators: <, >, <=, >=, =, !=
- User parentheses () to set the order of operations
- Expression parameters (5) can be defined by Name, Type (Number, Boolean, String, DateTime), and Value.
To save the event, click the Add button.
- The created event appears in the list of events by Name and Expression.
Add function in expression
Precondition: The New event form opens. Click the Add Function button to select an expression function from the list of built-in functions.
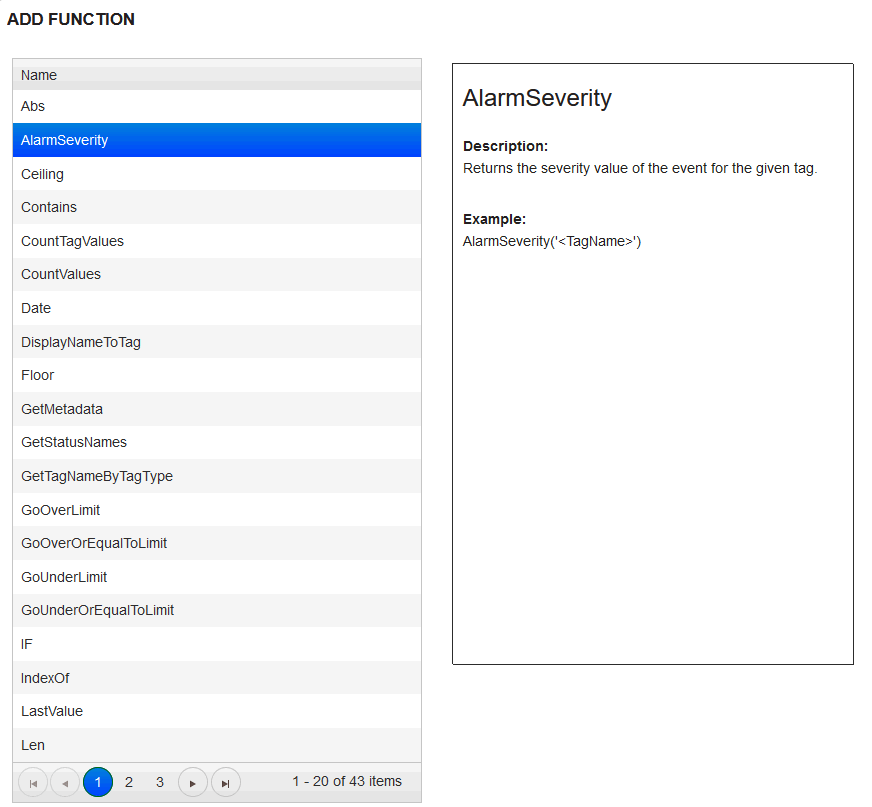
Figure 3: New event - Add function - built-in functions
Select a function from the list and click the Add button.
- The function is added in the expression field in a form for a New event.
The following list of built-in functions has been developed:
- Abs
- AlarmSeverity
- AVG
- AvgPeriod
- Ceiling
- Changed
- Contains
- CountTagValues
- CountValues
- Date
- DisplayNameToTag
- Floor
- GetMetadata
- GetStatusNames
- GetTagNameByTagType
- GoOverLimit
- GoOverOrEqualToLimit
- GoUnderLimit
- GoUnderOrEqualToLimit
- IF
- IndexOf
- LastValue
- Len
- Log10
- MachineProperty
- MAX
- MaxForPeriod
- MIN
- MinForPeriod
- now
- nowUTC
- Pow
- PreviousValue
- PreviousValueTime
- SPEED
- Sqrt
- Substring
- SubstringLen
- SUM
- TimePerValue
- TimePerValueExtra
- TimePerValueMultiple
- Trim
- TypeNameToTag
- ValueOf()
Add tag in expression
Precondition: The New event form is opened. Click the button +Add Tag to search and add tag in the expression field when creating an event.
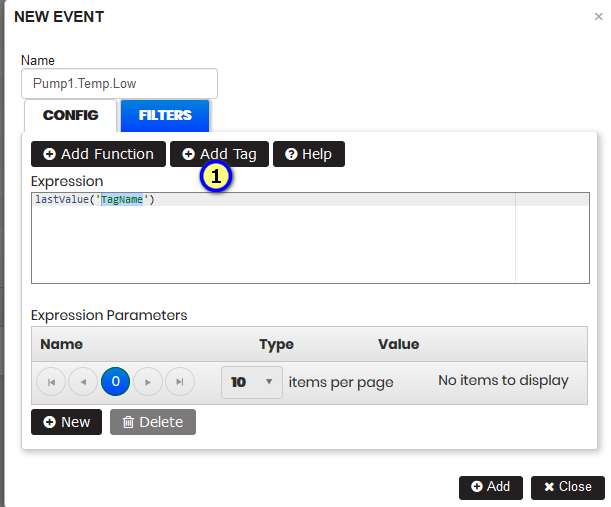
Figure 4: New event - add tag in expression
Click on Add Tag button.
- The Select tag form is opened.
Select a tag from all tags
Precondition: The Select tag form is opened.
There is possible to search for and select a tag between all tags.
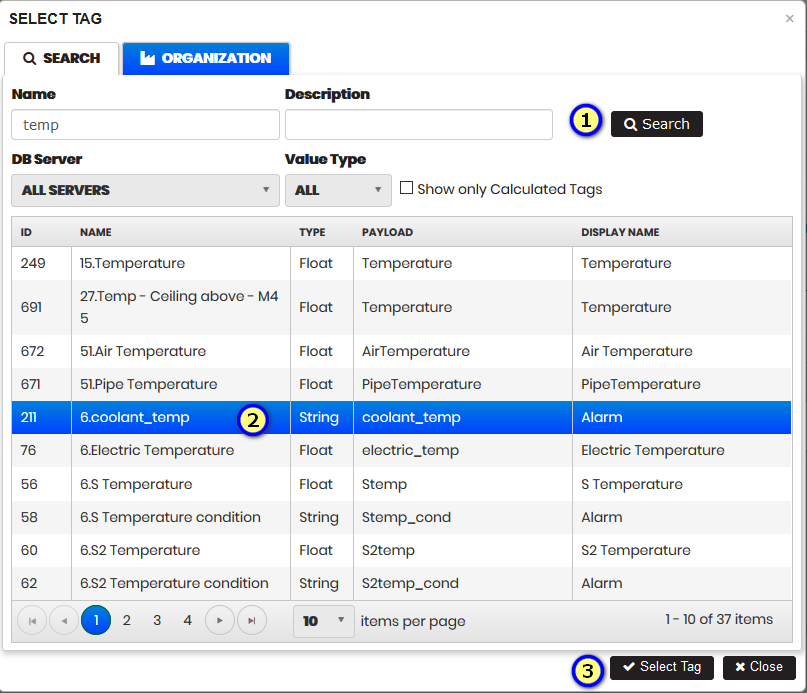
Figure 5: New event - search tag from all
- Filter tags by Name or Display Name and click Search. The tags are filtered.
- Select a tag from the list. The Select Tag button is enabled.
- Click the Select Tag button.
- The selected tag appears in the expression field.
Select a tag from organization tree
Precondition: The Select tag form is opened.
There is possible to search for and select a tag thourgh organization tree with departments and machines.
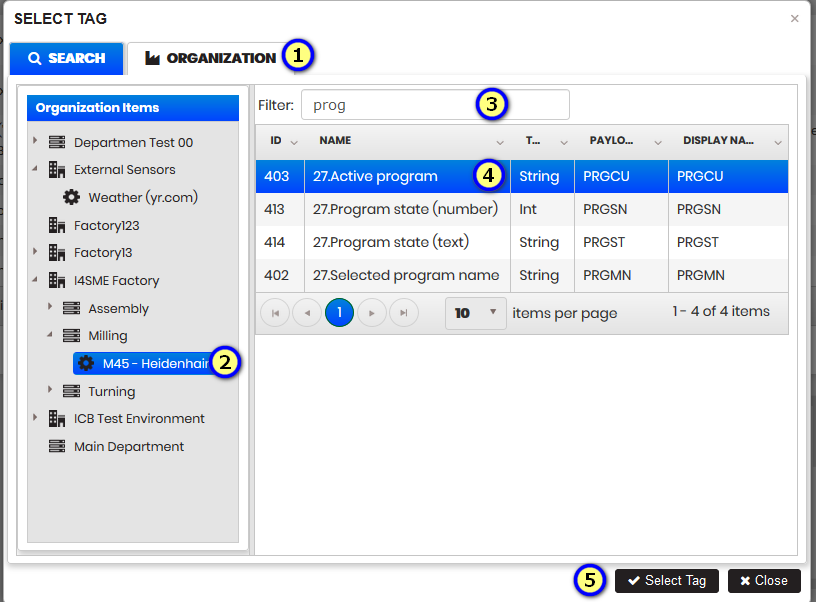
Figure 6: New event - search tag from organization tree
- Click on the tab Organization (1).
- The organization tree with departments and machines is shown.
- Expand the organization tree with departments, and select some machine (2).
- The list of tags for the selected machine is listed on the right side.
- Filter the tags by typing in the Filter (3) field.
- Select the tag from the list. The Select Tag button is enabled.
- Click the Select Tag
- The selected tag appears in events expression field.
Add parameters in expression
Precondition: The New event form is opened.
There is possible to define parameters for the expression field.
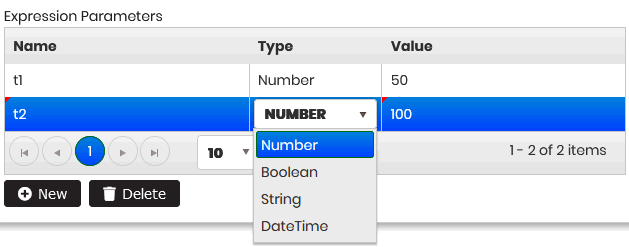
Figure 7: New event - define parameters for expression
- The defined parameters can be used in the event expression field.
Create events and warnings from tag limits
Precondition: The machine is selected in the organization tree. The TAGS tab is selected. The New tag form opens.
Purpose: When adding a tag of type INT, it is possible to set minimum or maximum values for the tag.
To configure the tag limits, follow the steps below:
- Select the Organization menu.
- Select the machine in the organization tree.
- Click the Tags tab. Filter tags. Click the Update button to edit the tag.
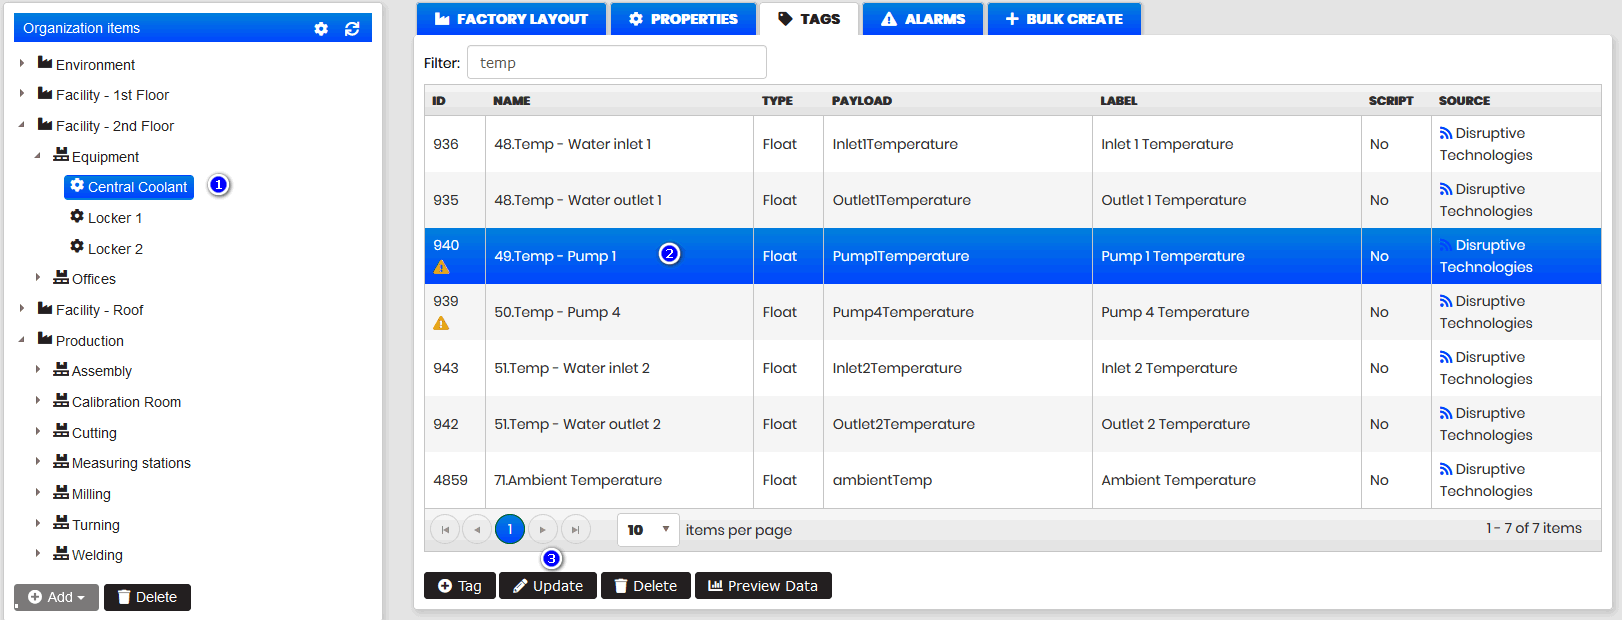
Figure 8: Machine - Select machine tag
- The Edit tag form opens.
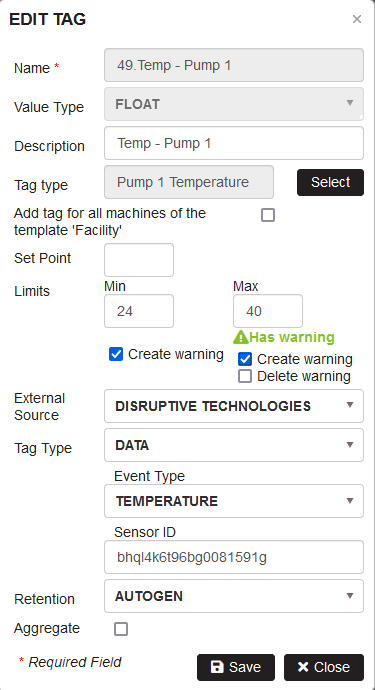
Figure 9: Machine- Edit tag - create warnings from tag limits
Enter the tag value limits for Min and/or Max. You can enter just one limit or both.
There are checkboxes below the Min and Max fields.
- Check both and click Save.
- Corresponding Events and Warnings are automatically created, which can be seen in the Events and Warnings lists.
Select menu Events and search in the list – e.g. Temp - Pump1

Figure 10: Events - аutomatically created events from tag limits
- Events are automatically created for the tag's MIN and/or MAX limits.
Select menu Warnings and search in the list – e.g. Temp-Pump1
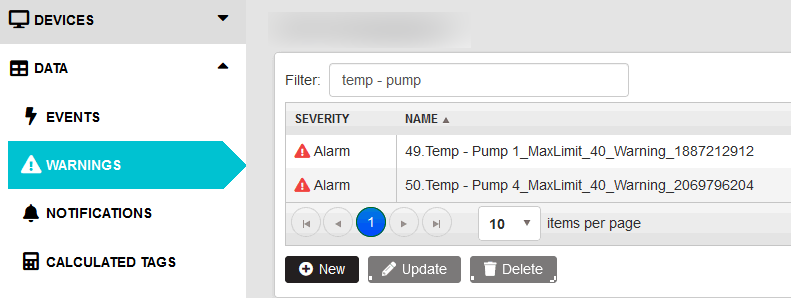
Figure 11: Warnings - automatically created warnings from tag limits
- Warnings are automatically created with the created events for the tag's MIN and/or MAX limits.
Delete events and warnings from tag limits
Precondition: There are created events and warnings from tag limits.
It is possible to delete events and warnings from the Edit tag form.
Select the tag with created events and warnings from tag limits. Click the Update button.
- The Edit tag form opens.
- In the form are visible checkboxes Delete warning.
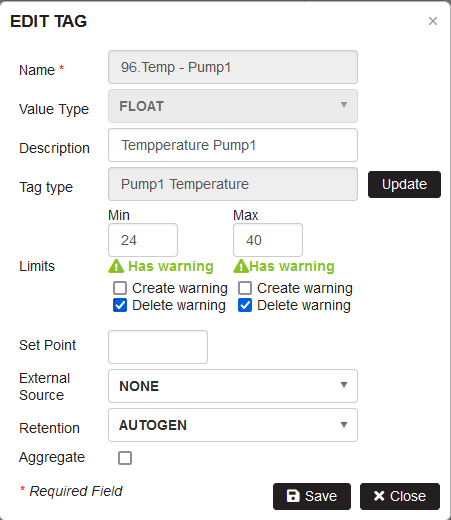
Figure 12: Edit tag - checked Delete warning
Select checkboxes Delete warning and click the Save button.
- All events and warnings automatically created from tag limits will be deleted.
Warnings
Purpose:
- Warnings are created with different severity: Information, Warning, or Alarm .
- Warnings have start and stop events .
- Warnings can be created automatically when tag limits are entered. Create events and warnings from tag limits.
- Warnings can be displayed on the dashboard to indicate that some tags values are out of bounds.
The section describes:
Precondition: Log into the Upkip Administration. Select the menu Data/Warnings.
- The Warnings page opens.
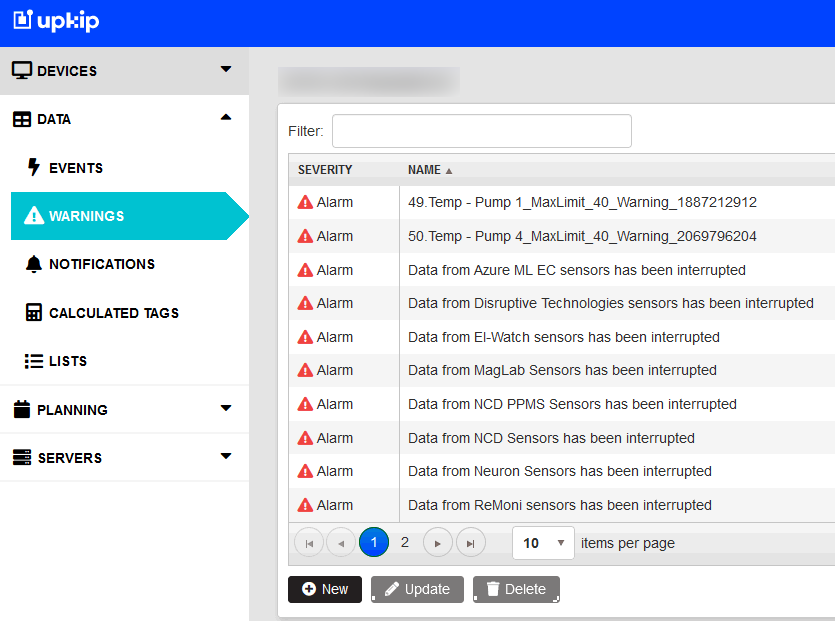
Figure 13: Warnings list
Create Warning
Precondition: The menu Warnings is selected. The warnings page is opened. The events are created.
Click on the New button.
- The NEW Warning form opens.
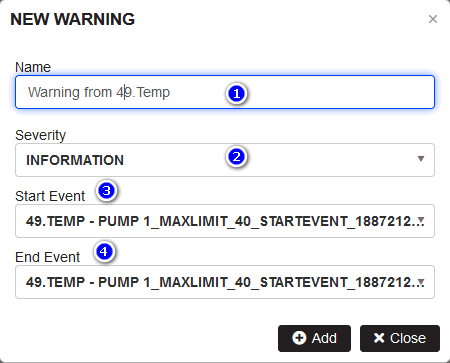
Figure 14: Warnings - create new warning
Enter the following data in the form:
- Name (1) of the warning.
- Severity(2) – select the severity of the warning from the drop-down list - Information, Warning, Alarm.
- Select start event (3) from the list of events.
- Select stop event (4) from the list of events.
- Click Add.
- The created warning appears in the list of warnings with its Severity and Name.
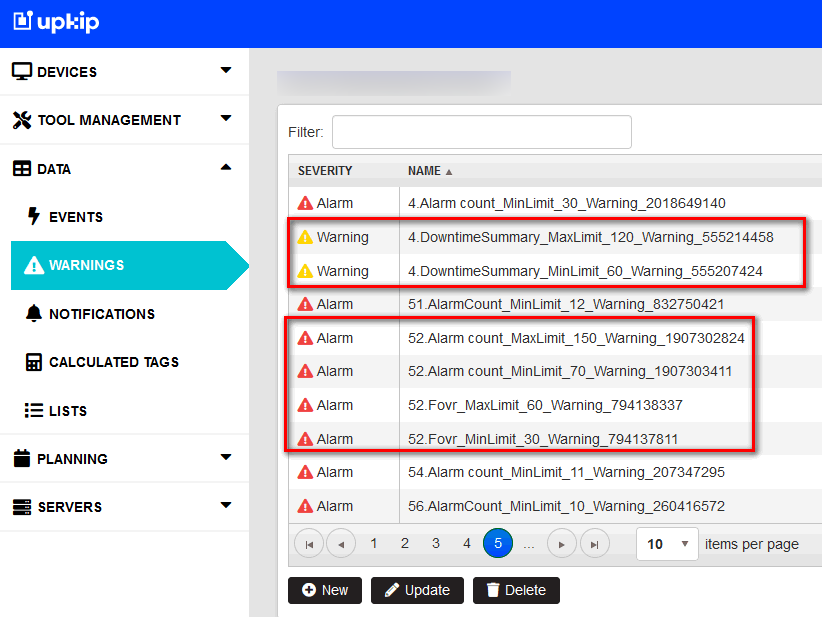
Figure 15: Warnings with different severity
Edit Warning
Precondition: The menu Warnings is selected. The warnings page opens.
Select a warning from the list and lick the Update button.
- The Edit Warning form opens.
The warning can be edited by changing the Name, Severity, Start, and Stop event. The warning severity is selected from the drop-down list: Alarm, Warning, Information.
Click the Save button.
- The warning is updated.
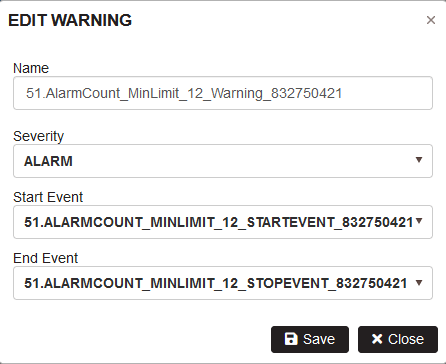
Figure 16: Edit Warning
The Severity of the warning could be edited by selecting a value from the dropdown - Information, Warning or Alarm.
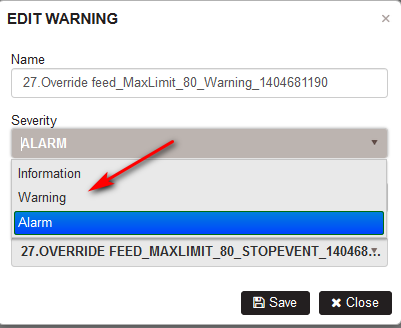
Figure 17: Edit warning - change severity
Delete Warning
Precondition: The menu Warnings is selected. The warnings page opens.
Select a warning from the list and click the Delete button.
- The confirmation warning is shown. Confirm with the Delete button.
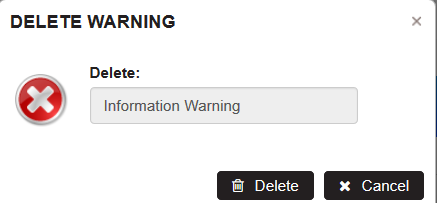
Figure 18: Upkip Administration - Delete warning
- The warning is removed from the warnings list.
Warnings from Tag Limits
Purpose: Create automatic warnings when tag limits are entered.
Warnings can be created automatically by entering minimum and/or maximum tag values with the **Create Warning checkboxes selected.
- Events and warnings are automatically created when the tag is saved.
Follow the steps Events/Create events and warnings from tag limits.
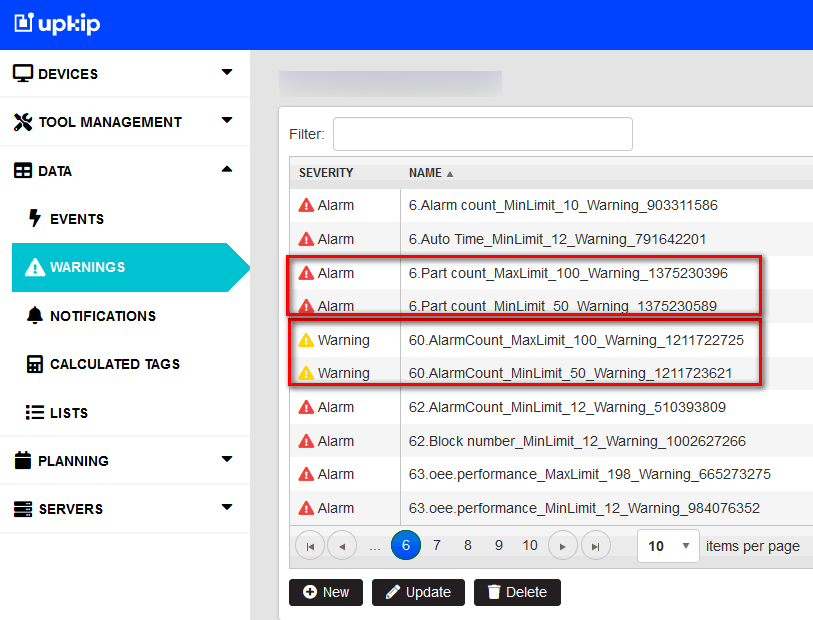
Figure 19: Warnings from tag limits
Deleting warnings created from tag limits is possible automatically by following the steps Event/Delete warnings from tag limits
Notifications
Purpose:
- Notifications are used to notify users of certain events.
- The event must be created before it can be used in a notification.
- Nofictions can be created via email, SMS, Viber messages, or Teams messages.
- In the text of the notification message, it is possible to use placeholders that retrieve different system information.
There section describes:
- Machine Alarms Notifications
- Email Notifications
- Viber Notifications
- SMS Notifications
- Microsoft Teams Notifications
- Allowed time interval for notifications
Precondition: Login to the Upkip Administration.
Select the Data/Notifications menu.
- The Notifications page opens.
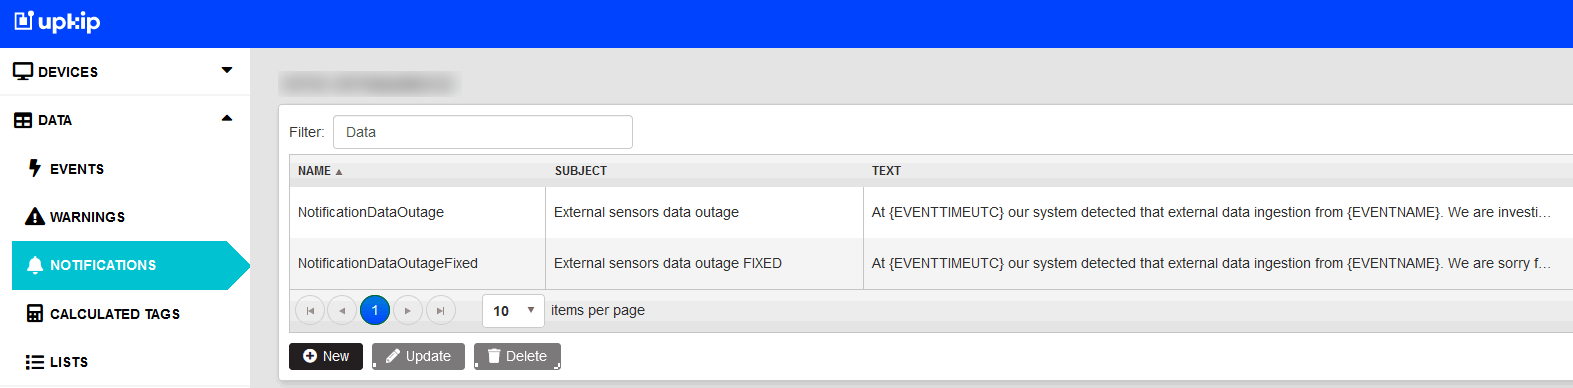
Figure 20: Notifications list
The table displays notifications by Name, Subject, and Text. In the last column there is a checkbox – private or not.
Machine Alarms Notifications
Purpose: To create automatic email notifications from the machine's alarms list.
Precondition: User with Administrator role is logged into the Upkip Administration.
Select the ORGANIZATION menu. In the organization tree, select the machine. Click the ALARMS tab.
- The list with machine alarms is displayed.

Figure 21: Create notification by selecting machine alarms
Find through the filter some alarms and select them through the checkboxes.
Click the Create Notification button.
- An Event is automatically is created for the selected alarms.
- The Edit Notification form opens with a name filled in and an event created in the Events list.
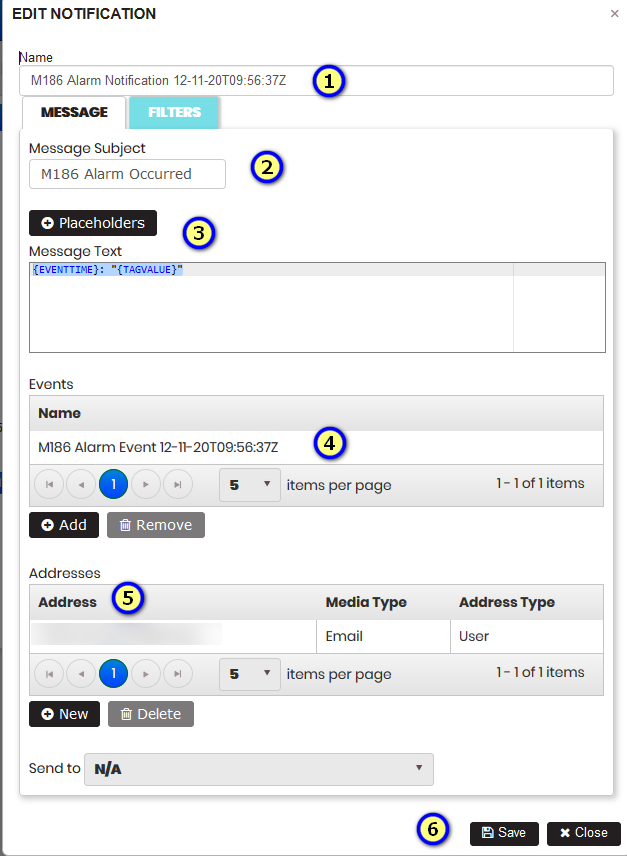
Figure 22: Upkip Administration - Edit notification automatically opened
The created automatic notification, which is pre-filled, can be edited and saved.
- Name: Sensor ID Alarm Notification <current date and time>.
- Message Subject: Sensor ID Alarm Occurred.
- Message Text: Populated with placeholders {EVENTTIME}: "{TAGVALUE}". There is an option to add additional text or insert placeholders from presets.
- To insert placeholders, click the Placeholders button.

Figure 23: Notifications - placeholders list
After selecting from the list and clicking the Add button, the placeholder is inserted into the notification message text.
- Events: Automatically selects a created event for a selected alarm.
- Addresses: Media Type=Email, Address Type=User, and Address=user's email are added automatically. The user's email can be changed by selecting from the list.
If an alarm message is sent to the machine tag of type Alarm, the event is fired.
The notification email configured with it is sent to the user.
Email Notifications
Purpose:
- Notifications could be configured to send user email messages.
- Notifications are triggered by the events. An expression with machine tags is defined in the event.
- If the event has occurred, the notification is triggered and the defined message in the notification is send to the user's email.
The section describes:
Configure User
Users in the Upkip Administration are configured following the steps Users Management.
Log in as a user with the System Administrator role in the Upkip Administration.
In the User List find the user and click Edit. Make sure that user email is configured in the e-mail field. This is the email to which an email notification will be sent. This email could be different from the username email. In the user's details is entered a phone number with the area code.
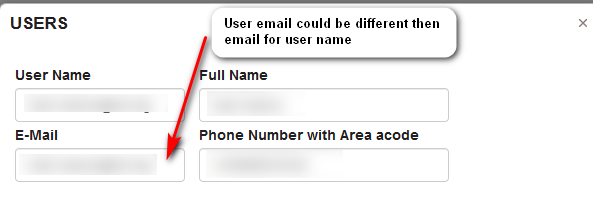
Figure 24: Upkip Administration - User configuration with email
Configure Event and Email Notification
Select the machine ID and tag which will be used in the event configuration.
Select the machine tag by following the steps in Search and add Tag
To create an event, see Create new event
Select the menu Notifications.
-
The Notifications page opens.
-
The table displays notifications with name, subject, and text.
Click the New button to create a new notification.
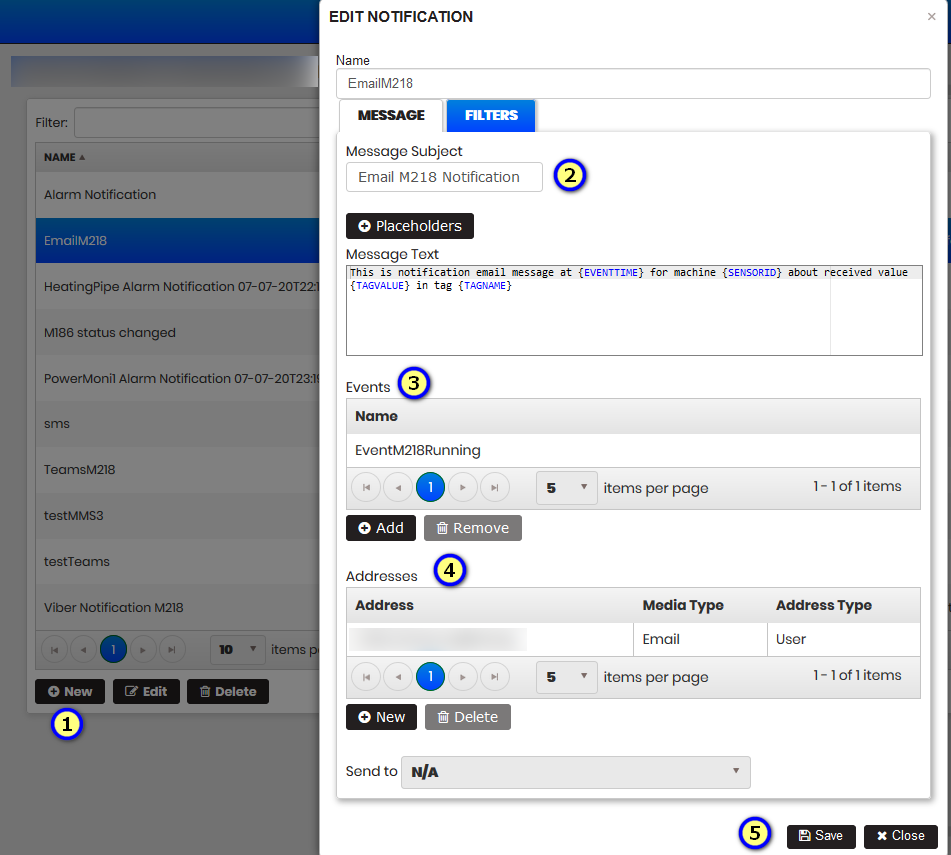
Figure 25: Upkip Administration - Create notification with media type email
Enter the Name, Message Subject, and Message text.
- The subject will appear as the subject of the email.
- It is possible to select some placeholders by clicking Placeholders and selecting from the list.
- Click the Add button to add an event. Select the created event from the list.
- Click New to enter Address, Media Type, and Address Type.
- For Media Type select Email.
- For Address Type select User.
- For Address, click and select user from the user list.
- Click Save to save the notification.
The Notification will be saved to the Notification list.
Send Email Notification
Data sent to the machine tag will trigger the associated event.
A notification email about this event will be sent to the user's email.
The email will be with:
- Email Subject equal to Message Subject.
- Email message text equal to the text of the notification message.

Figure 26: Notification email with configured message text
Viber Notifications
Purpose:
- Notifications can be configured to send messages to a Viber public account.
- Users subscribed to this account can receive a message from configured notifications.
- Notifications are triggered by events. An expression with machine tags is defined in the event.
- If the event occurred, the notification is triggered and the defined message in the notification is sent to the Viber Upkip Notifier.
Precondition: Setup Viber account
The section describes:
- Configure user
- Configure event and Viber notification
- Subscribe to Upkip Viber notifier
- Send Viber notification
Configure User
Precondition: Users in Upkip Administration are configured following the steps Configure Users in Upkip.
Log in as a user with the System Administrator role in Upkip Administration.
In the User List find the user and click Edit. Enter in the Phone Number with Area code the user phone number that will be used for Viber notification.
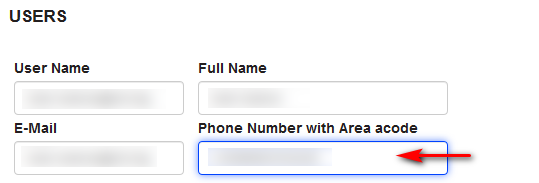
Figure 27: Upkip Administration - User configuration with phone number
Configure Event and Viber Notification
Precondition: User logged into Upkip Administration. Select the Organization menu. Select a machine from the organization tree.
Select the machine tag by following the steps Search and add Tag
Create an event following the steps Create new event
Select the Notifications menu. Click New.
- The New notification form opens.
Complete the notification form:
- Notification name.
- Message subject.
- Message text. It is possible to use placeholders from the list by clicking Placeholders.
- Event – select an event from the events list.
- Addresses:
- Media Type – select Viber.
- Address Type – select User.
- Address - double click and select our configured user with the phone for Viber notifications. The selected user appears in the address field.
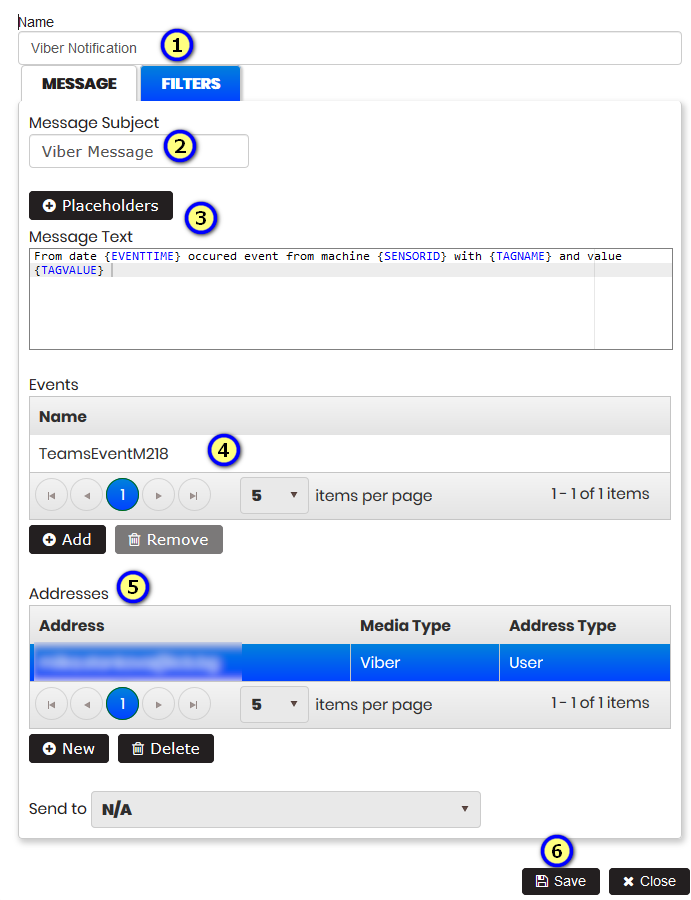
Figure 28: Upkip Administration - Create notification with a message to Viber phone number
Click Save.
- A notification with media type Viber is created.
- Viber invitation email is sent to the user's email.
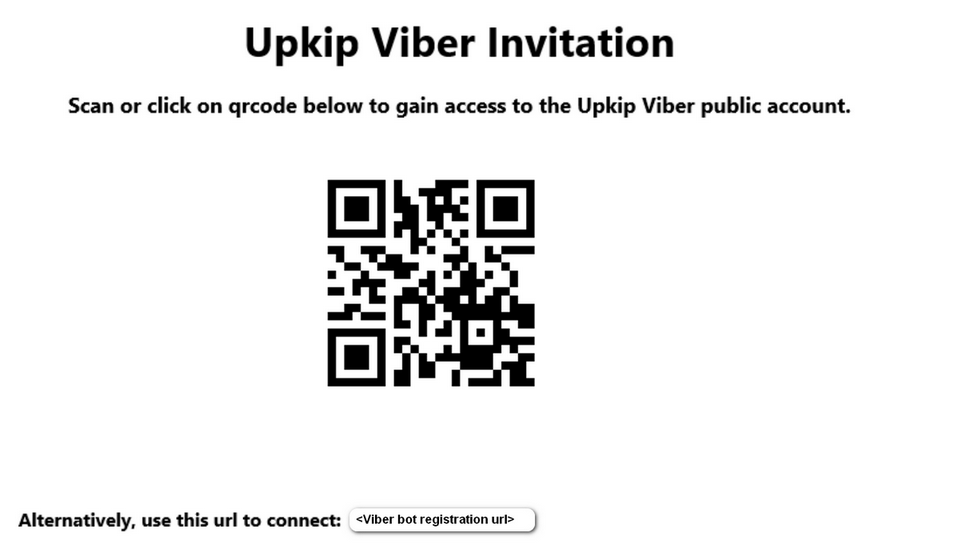
Figure 29: Upkip Viber invitation email
Subscribe to Upkip Viber Notifier
Precondition: User has received a Viber invitation email. The invitation email contains a QR code for the Upkip Viber Notifier.
Note! Scanning the QR code or clicking the link is only possible from a mobile device.
Оpen the link by clicking opens on the mobile device.
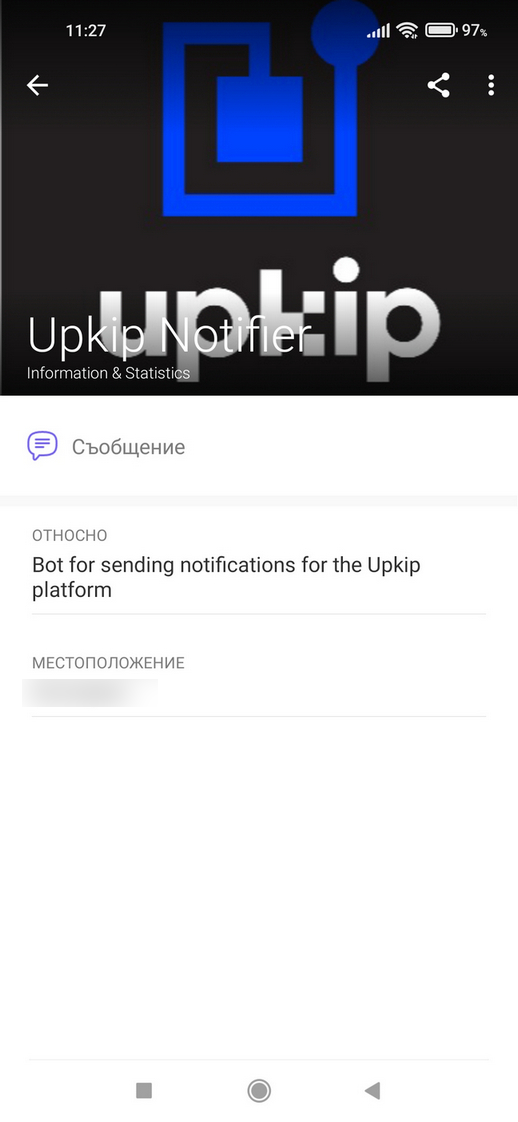 Figure 30: Upkip Viber Notifier
Within a minute, the user will receive a message to the Viber Upkip Notifier.
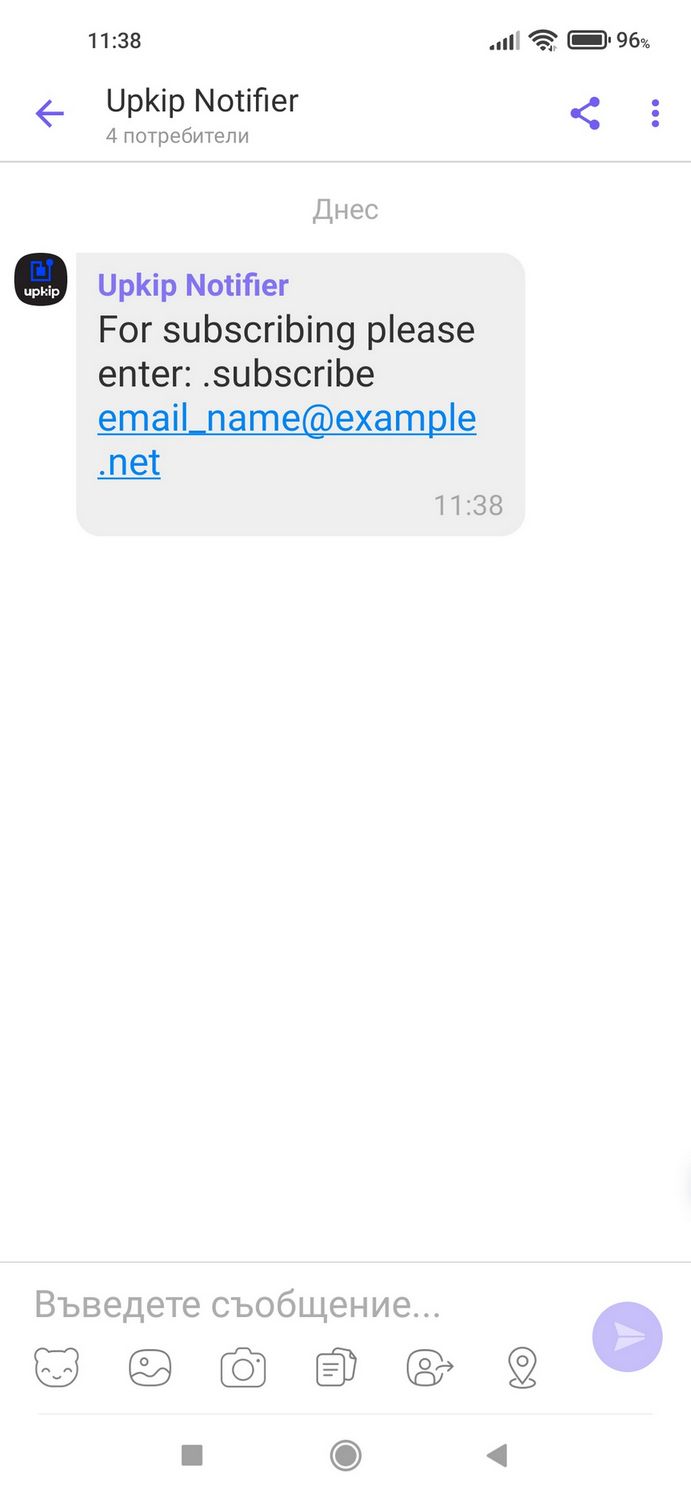 Figure 31: Upkip Viber Notifier prompt for subscribe message
Type in chat and send a text message.
.subscribe [email_address@example.net]
- A response from the Viber bot appears :A verification email has been sent to your email address.
- Verification email is sent to the user email with subject: Viber Verification and text.
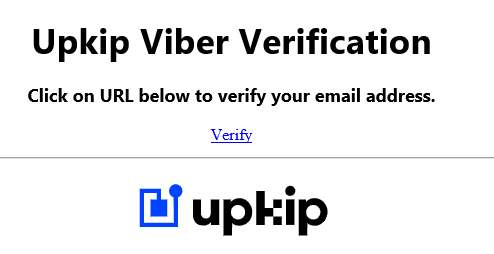
Figure 32: Upkip Viber verification email
Open the received email and click on the Verify link to do email confirmation.
- The confirmation email for successful verification has been sent.
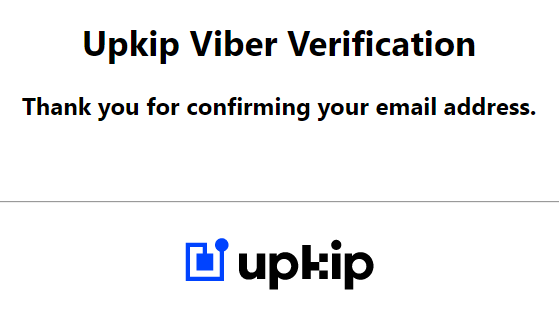
Figure 33: Upkip Viber Verification confirmation page
- In Viber, a message is received from Vthe iber Bot :
- You are successfully subscribed with email email_address@example.net
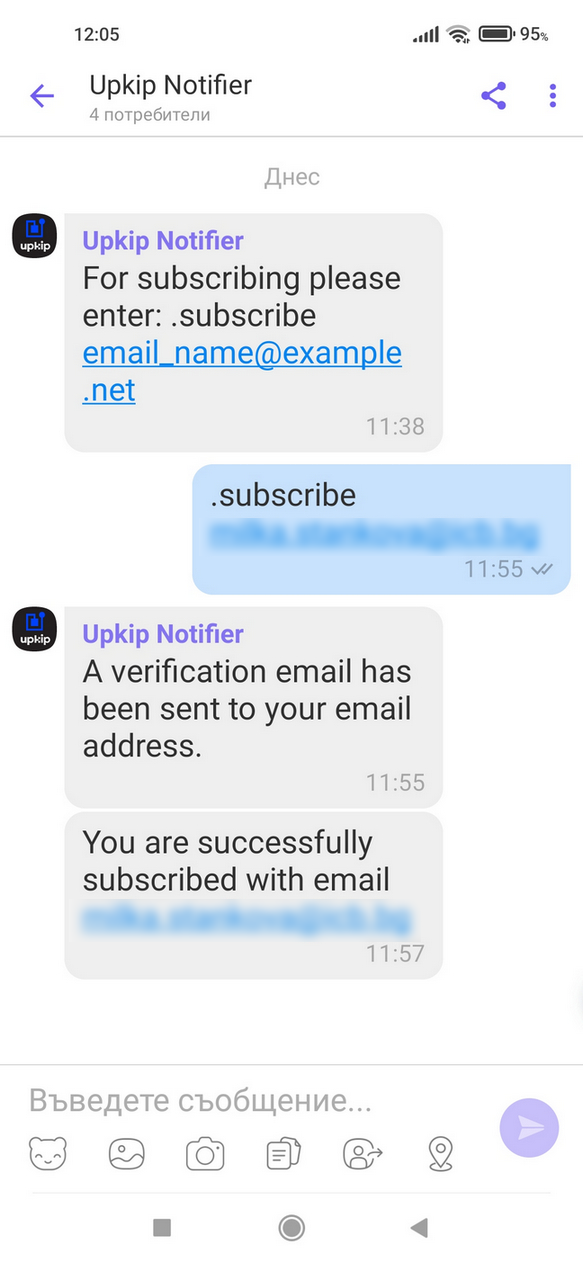
Figure 34: Upkip Viber successful subscription
Send Viber Notification
Preconditions:
- User is successfully subscribed to Viber Upkip Notifier account.
- Notification to user is configured Configure event and Viber notification.
If the event configured in the notification has fired, a notification with media type=Viber and destination=User should send a message to the user's Upkip Notifier Viber account.
SMS Notifications
Purpose:
- Notifications could be configured to send SMS messages to users.
- Notifications are triggered by the event. An expressions with machine tags is defined in the event.
- If the event has occurred, the notification is triggered and the message specified in the notification is send to the user's mobile phone as a SMS.
The section describes:
Configure SMS Notification
Select the machine and tag which will be used in the event configuration.
Select the machine tag by following the steps Add Tag
Create an event following the steps Create new event
Select the menu Notifications.
- The notifications list is displayed with name, subject, and text.
- Click the New button to create a new notification.

Figure 35: Upkip Administration - Create notification with media type SMS
To create a notification, enter:
- Name, Message Subject, Message text.
- Message text will be shown as SMS text.
- It is possible to select some placeholders by clicking Placeholders and selecting from the list.
- Click to Add an event. Select from the list of created events.
- Click The New to enter address, media type, and address type.
- For Media Type select SMS.
- For Address Type select User.
- For Address, click and select a user from the user list.
- Click Save to save the notification.
The Notification will be saved in the Notification list.
Send SMS Notification
Preconditions:
- The user is configured in Upkip Adminitration.
- User notification as SMS is configured Configure SMS notification
If the event configured in the notification has been triggered, a SMS notification will be sent to the user's phone. The message text from the notification will come as SMS text.
Microsoft Teams Notifications
Purpose:
- Notifications can be configured to send messages to a Microsoft Teams channel where invited team members can read and reply.
- Notifications are triggered by the event. An expression with machine tags is defined in the event.
- If the event has occurred, the notification is triggered and the message specified in the notification is sent to the configured team channel.
- To work the Teams notifications, the <Upkip Notifiermember must be added to the team.
The section describes:
- Microsoft Teams Configuration
- Configure event and Teams notification
- Send messages to Microsoft Teams
Microsoft Teams Configuration
The user must be an owner or invited to a team in Microsoft Teams.
The user opens Microsoft Teams and views created teams and channels.

Figure 36: Microsoft Teams Configuration
After creating a team default channel General is created.
Additional channels can be added to the team.
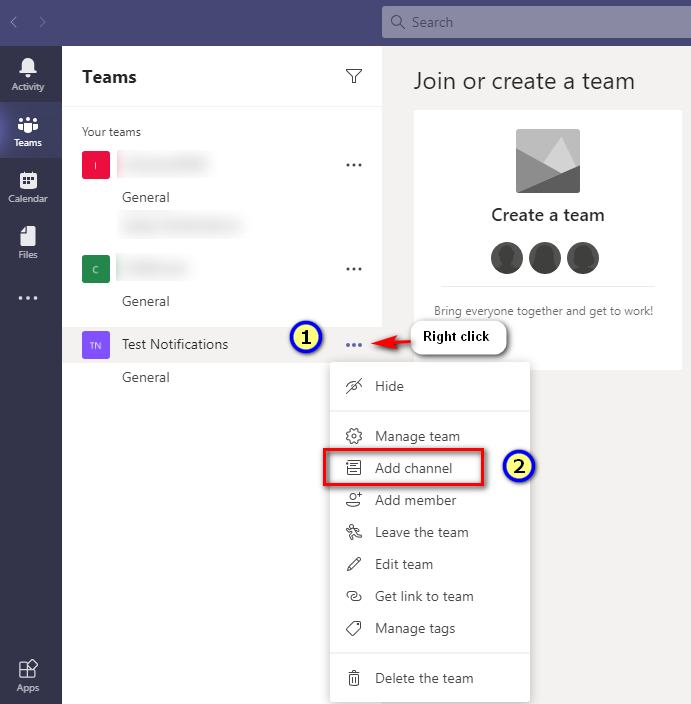
Figure 37: Microsoft Teams Configuration - Add channel
Right-click on the Team menu and select Manage Team.
- The Manage Team page opens with the Members menu selected.
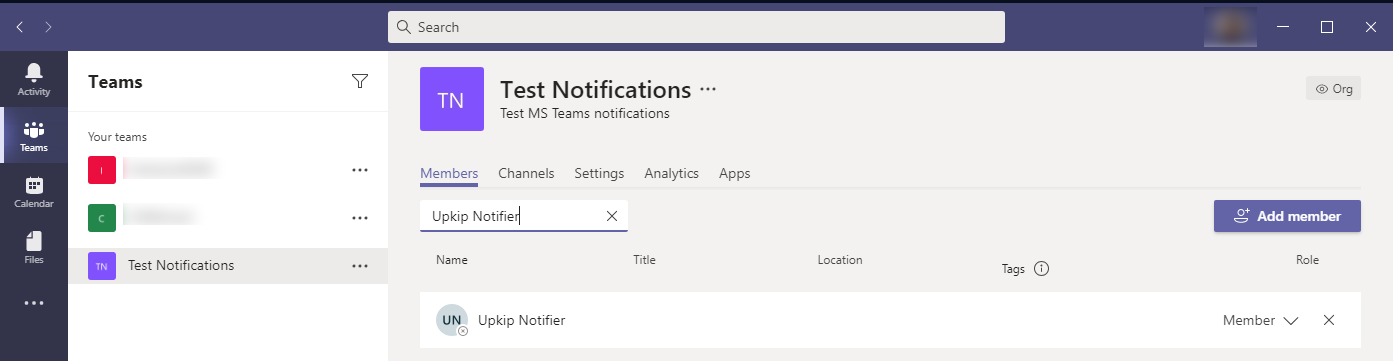
Figure 38: Microsoft Teams Configuration - Manage Team
Type in the member search box Upkip Notifier and add to the team.
- Upkip Notifier must be added to the Team (This member is used for system purposes only).
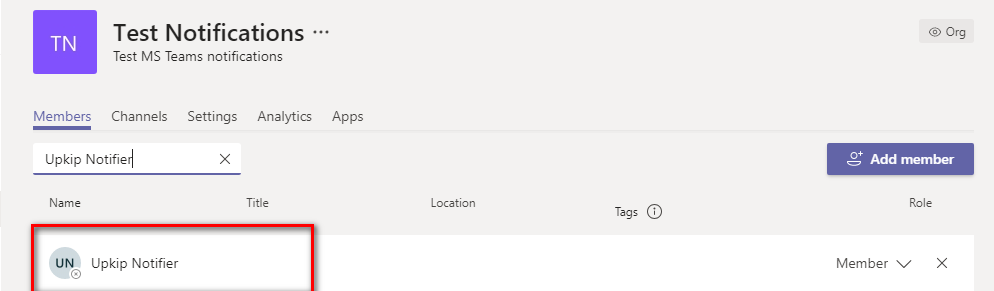
Figure 39: Microsoft Teams Configuration -Manage Team - Add member Upkip Notifier
Get the channel link by right-clicking on the channel menu and selecting Get link to channel.
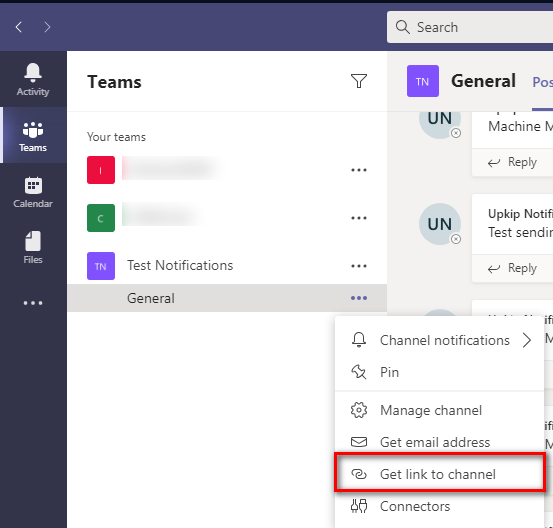
Figure 40: Microsoft Teams Configuration - Channel - Get link to channel
Copy the link to the clipboard by clicking the Copy button.
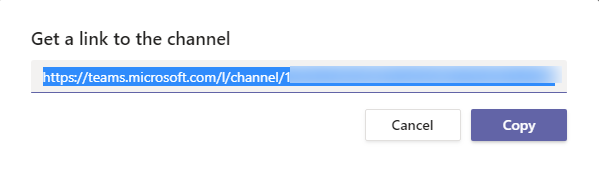
Figure 41: Microsoft Teams Configuration -Copy link to channel
- The channel link is copied to the clipboard and will be used to configure the notifications in the Upkip Administration.
Configure Event and Teams Notification
Precondition: Login to the Upkip Administration.
-
Configure the event by following the steps Create new event.
-
Configure the notification with created Event.
Select the menu Notifications .
- The notifications list is displayed with name, subject and text.
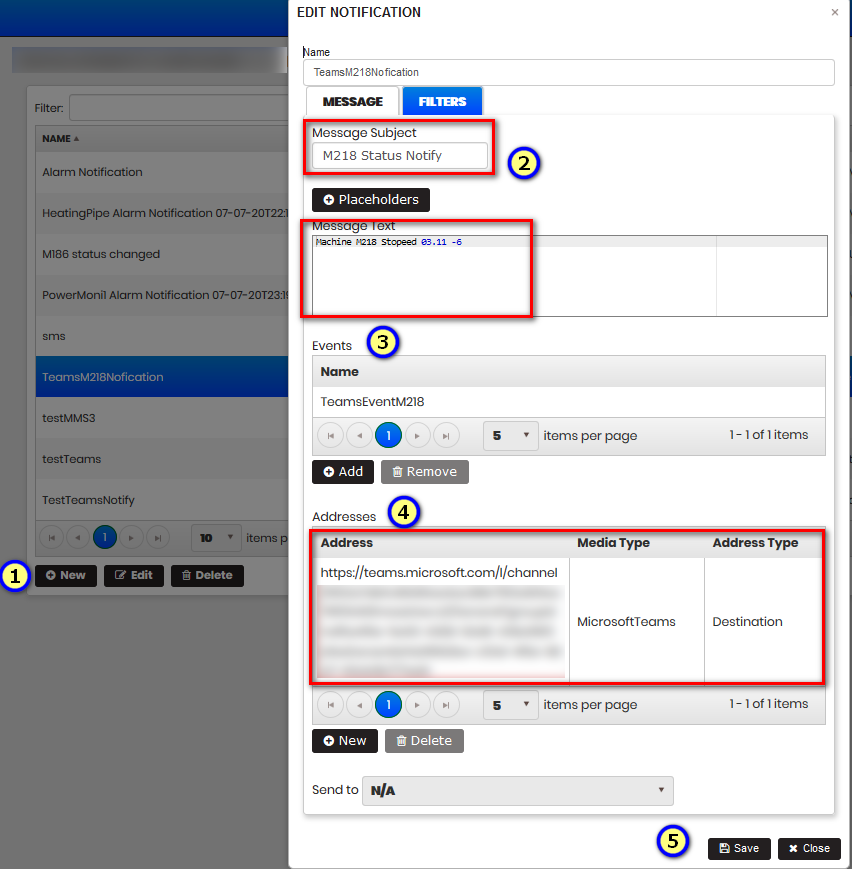
Figure 42: Upkip Administration - Create notification with destination Teams
- Click the New button to create new notification.
To create notification, enter:
- Name, Message Subject, Message text. The message text will be shown in the Microsoft team channel.
- It is possible to select some pre-defined placeholders by clicking Placeholders and choosing from the list.
- Click to Add an event. Select a created event from the list.
- Click New to enter Address, Media Type, and Address Type.
- In the address, paste the copied channel link.
- For Media Type select MicrosoftTeams.
- For Address Type select Destination.
- Click Save to save the notification.
The created Notification will appear in the Notifications list.
Send messages to Microsoft Teams
Open Microsoft Teams and select a created notification channel.
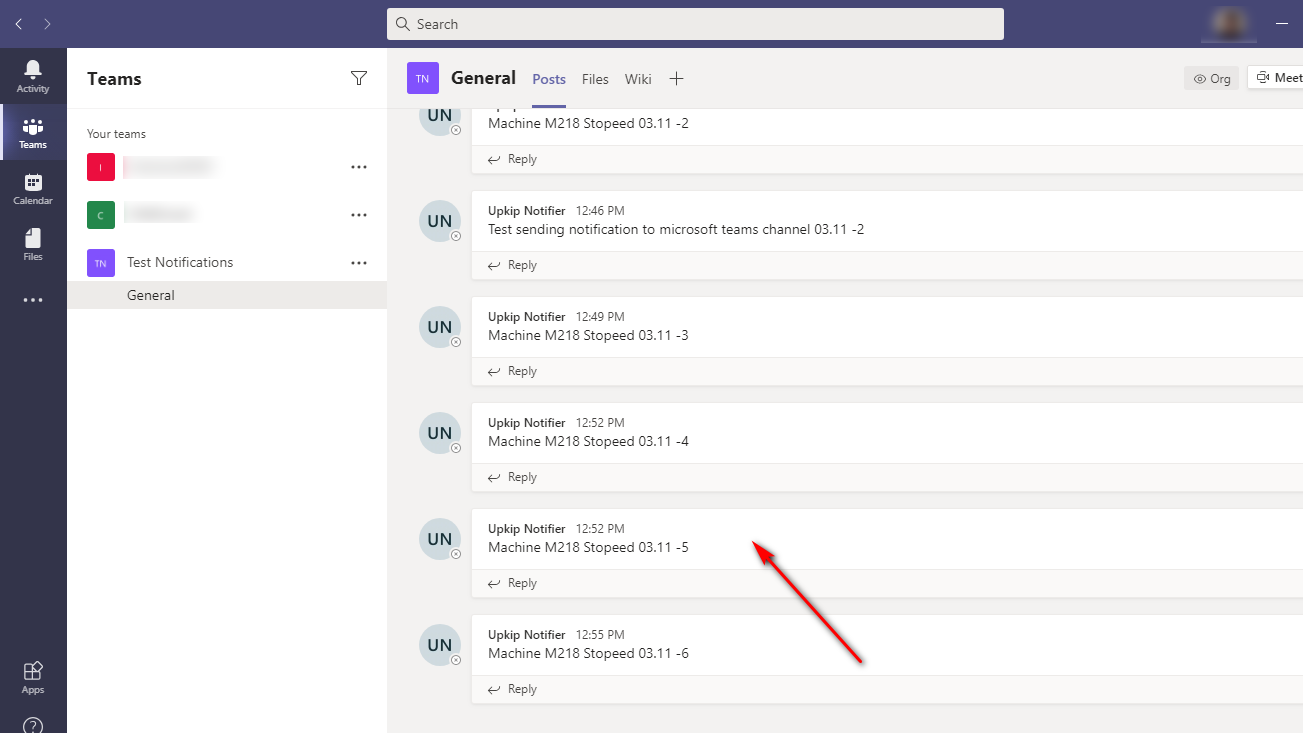
Figure 43: Microsoft Teams - View submitted message from notification
When an vent and a notification are triggered, the message is sent to Teams and will be visible to all team members.
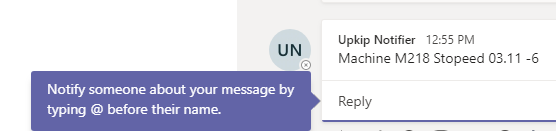
Figure 44: Microsoft Teams - Reply to Upkip Notifier message
Team members can click Reply to notify someone of the message by typing ‘@’ before their name.
Allowed time interval for notifications
Purpose: Configuring the allowed notification time interval for the users allows to disable the receipt of Viber, Email, or SMS notifications for time outside the specified allowed time interval.
Precondition: A user with an administrator role is logged into Upkip Administration.
Configure allowed time interval for notifications
Open the users list by clicking on the users' icon.
Figure 45: Upkip Administration - Open users list
From the users' list select the user and click Edit.
- The Edit user form opens.
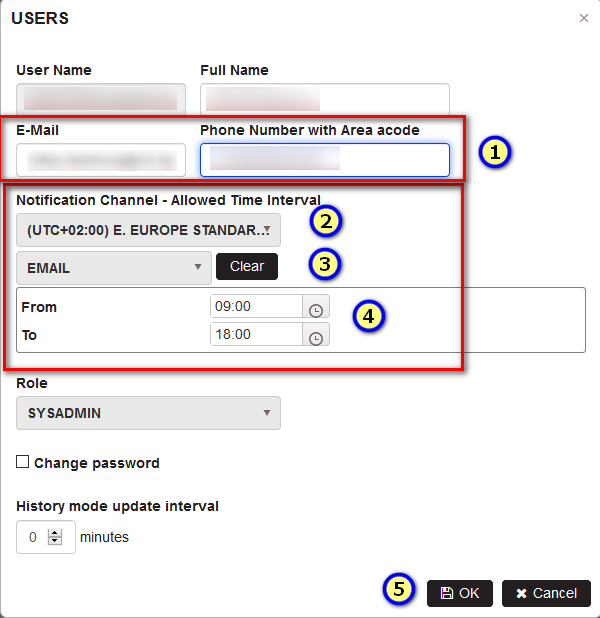
Figure 46: Upkip Administration - Configure user with an allowed time interval for notifications
- Enter user email to receive email notifications.
- Enter user phone number with area code for receiving SMS or Viber messages.
- Select time zone – e.g. (UTC+02:00)E.EUROPE STANDARD TIME.
- Select from the dropdown menu EMAIL, SMS, or Viber.
- Specify for each selected notification channel a From-To time for the allowed time interval.
- Click OK to save the user.
- The user data is saved with entered times for each notification channel.
Configure Email, Viber, SMS notifications
Configure events and email notification following the steps Configure Event and Email Notification
Configure event and Viber notification following the steps Configure Event and Viber Notification and Subscribe to Upkip Viber Notifier
Configure events and SMS notification following the steps Configure SMS Notification
Send notifications within or outside the allowed time interval
Send email notification following the steps Send Email Notification
Send SMS notification following the steps Send SMS Notification
Send Vibver notification following the steps Send Viber Notification.
Trigger the event and notification for each notification channel at the specified time interval.
- Notification is sent.
Trigger the event and notification for each notification channel outside the specified time interval.
- Notification is not sent.
Calculated Tags
Purpose: Calculated tags are used to execute expressions on the base tag values and assign results to the Result tag. To create the expression built-in functions can be used.
Base and Result Tags
Create Base and Result tags that will be used for the definition of the calculated tag.
Select Organization and some machine under department.
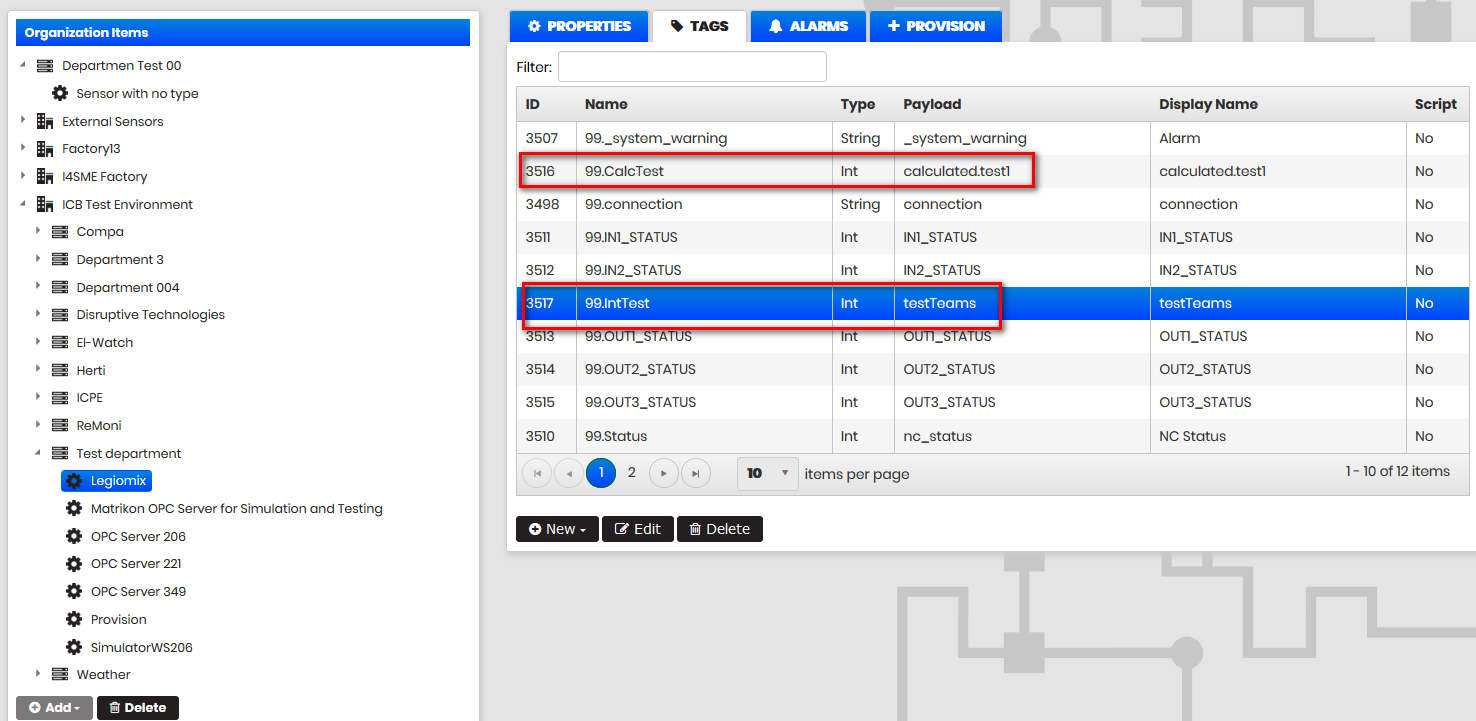
Figure 47: Edit machine -Select tags for base and result tag
Base tag and Result tag must exist in the machine tag list.
Add Calculated Tag
Precondition: The user is logged into the Upkip Administration. Base and Result Tags are created.
Select the menu Data/Calculated Tags.
- The Calculated Tags page opens.
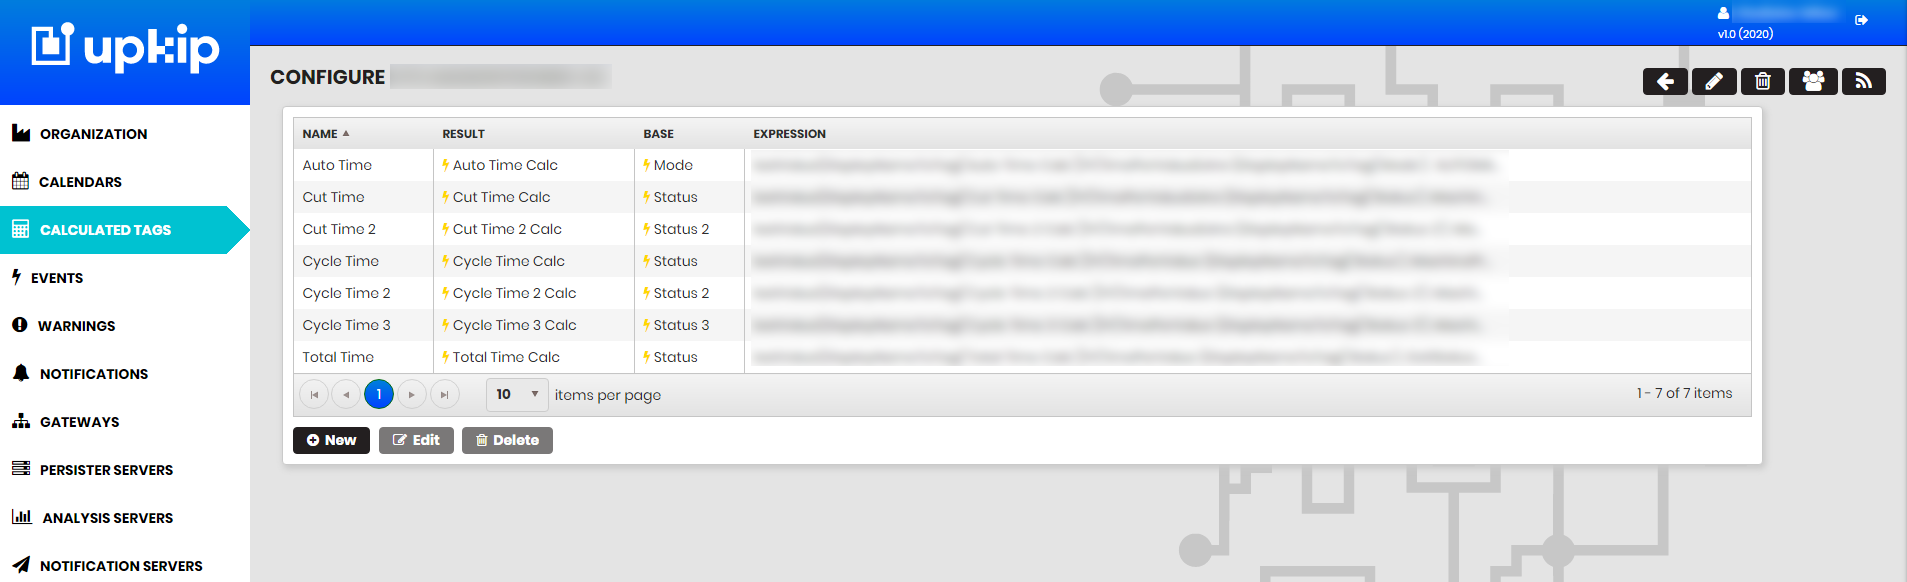
Figure 48: Calculated Tags
Click the New button.
- The New calculated tag form opens.
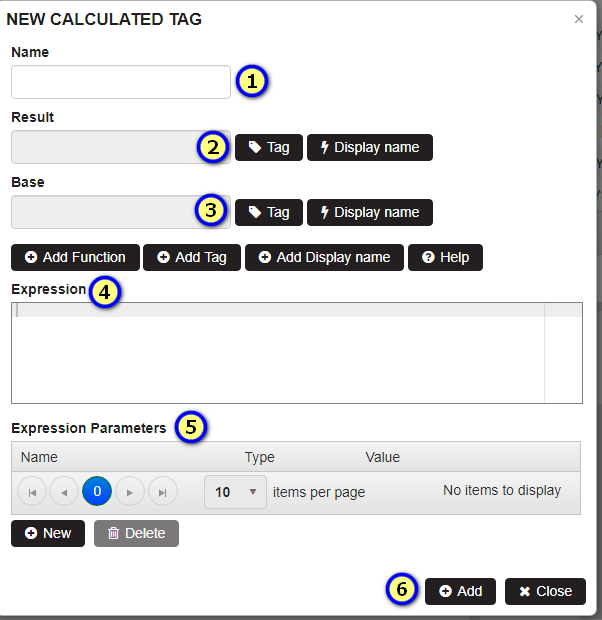
Figure 49: Add new calculated tag
Enter the following data in the form:
- Name - enter the calculated tag name.
- Base – select a base tag by searching between tags or searching by Label or Payload.
- Result – select a result tag by searching between tags or searching by Label or Payload.
- Add expression to execute on the base tag. It is possible to add functions from the built-in functions, use mathematical, logical or comparison operators, parentheses if necessary. Additional tags can be added to an expression.
- Expression Parameters - It is possible to define expression parameters, that are used in the expression.
- Click Add
- The calculated tag is created and appears in the list.
Search for Base and Result Tags
- When searching to add base and result tags, it is possible to search for a tag from all tags or from the organization tree.
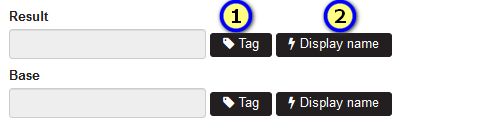
Figure 50: New Calculated tag - Select base and result tags
- When adding Base or Result Tags it is possible to select not real tags but Label with the specific Type.
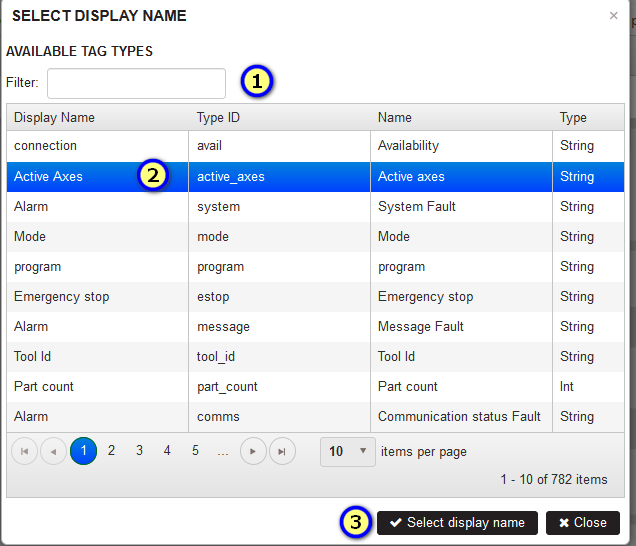
Figure 51: New calculated tag - select tag by label
After adding the tag or label they are filled read-only in the fields for Base tag and Result Tag.
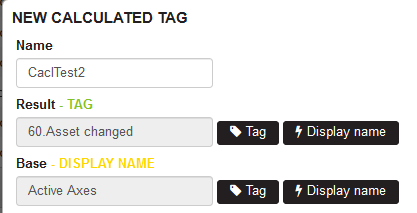
Figure 52: New calculated tag - Selected base and result tags
Add Expression
When creating a calculated tag, it is possible to create an expression that will be executed on the base tag. The result of the execution will be recorded in the Result Tag.

Figure 53: New calculated tag - Add expression
To create an expression can be used:
Built-in functions – implemented functions that can be selected from the list.
Add Tag – it is possible to select the tag from all tags or from the organization tree to add to an expression.
- Use mathematical or logical operations, operators for comparison, or parentheses to create expression.
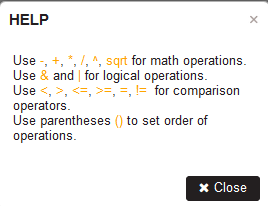
Figure 54: New calculated tag - Add expression operators
- It is possible to define expression parameters and use them in the expression.
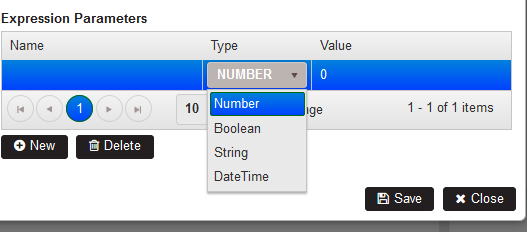
Figure 55: New calculated tag - Add parameters
The expression parameter has a Name, Type and Value. Use in an expression with its name.
After filling the mandatory fields – Name, Result, Base, and Expression, click Save.
- The calculated tag is saved and appears in the list of calculated tags.
For example:

Figure 56: Calculated tags list
Built-in Functions
To add a function in an expression, click the Add Function button.
- The list with predefined functions is displayed.
When selecting a function, a Description and Example appears on the right side.
Select a function and click the Add button.
- The selected function appears in the expression section.
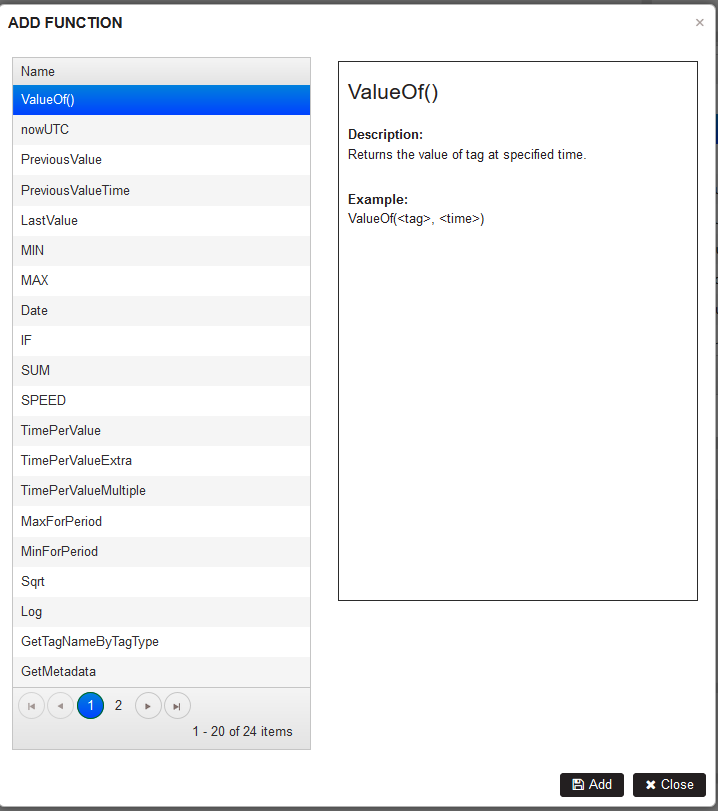
Figure 57: Built-in functions
Lists
Purpose: Lists are a special section that provides an opportunity to:
- Provide common and flexible functionalities within the platform.
- Users to freely define hierarchical data structures for various purposes.
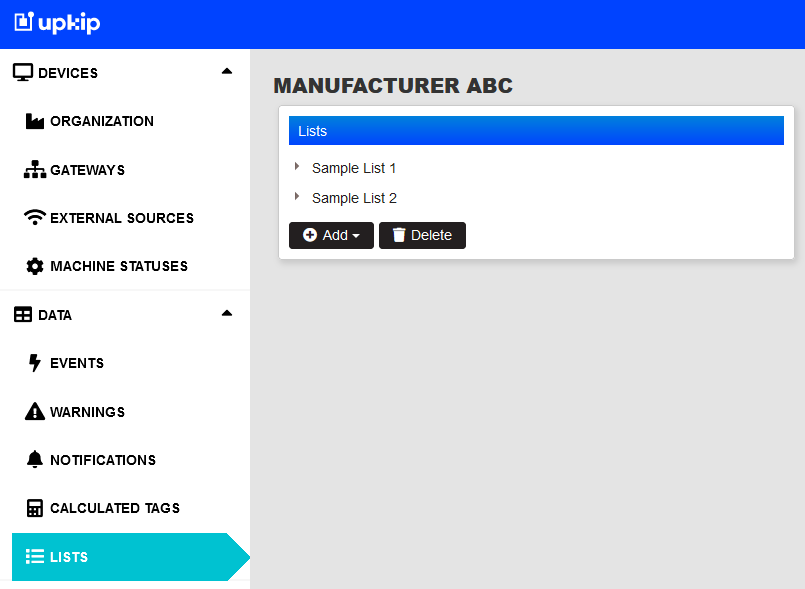 Figure 58: Lists menu
Working with lists is quite simple.
- Lists are organized in a hierarchical manner.
- A list can contain multiple child lists.
- A list can contain multiple child list items.
- A list can contain a combination of child lists or list items.
In general, lists are made to organize specific list items (data items). Each list item has an associated Label (text value) and Color provided in hexadecimal format.
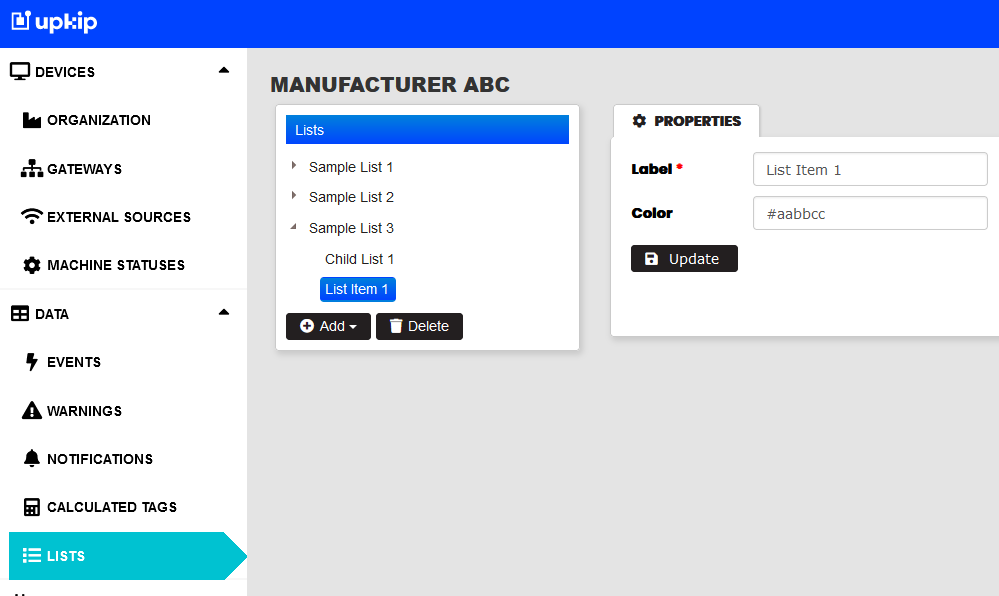 Figure 59: Lists menu
A new list or list item can be added by clicking the Add button. The available options are limited based on the currently selected element in the structure. To add a list item, a list must be selected.
Complete the following properties.
- Lists
- Name - a name for internal (system usage) which will be hidden in UI.
- Label - a user-friendly name acting as display name for the list. The name and label can be the same.
- Parent - Parent list, if this is a child list.
- Type - a specific predefined internal list type. Set Unassigned for non-specific lists.
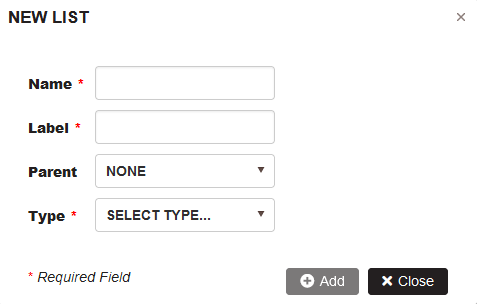 Figure 60: Add List
- List Items
- Name - a name for internal (system usage) which will be hidden in UI.
- Label - a user-friendly name acting as display name for the list. The name and label can be the same.
- Color - color code provided in hexadecimal format.
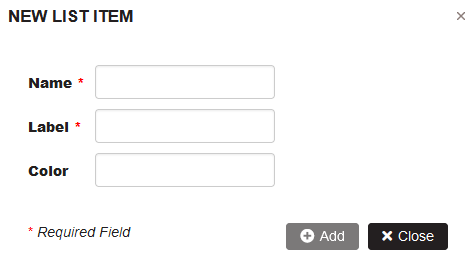 Figure 61: Add List Item
Downtime Tagging
Purpose
- The Downtime tagging configuration applies to the Upkip Visualization downtime charts.
- Downtime tagging uses different downtime tagging reasons grouped into categories.
- Every organization in Upkip has a set of downtime reason lists. Reasons are grouped into standard categories Man, Machine, Method, Material, etc.
- Organizations can customize them or create additional machine-specific lists of downtime tagging reasons.
Default Downtime Reasons
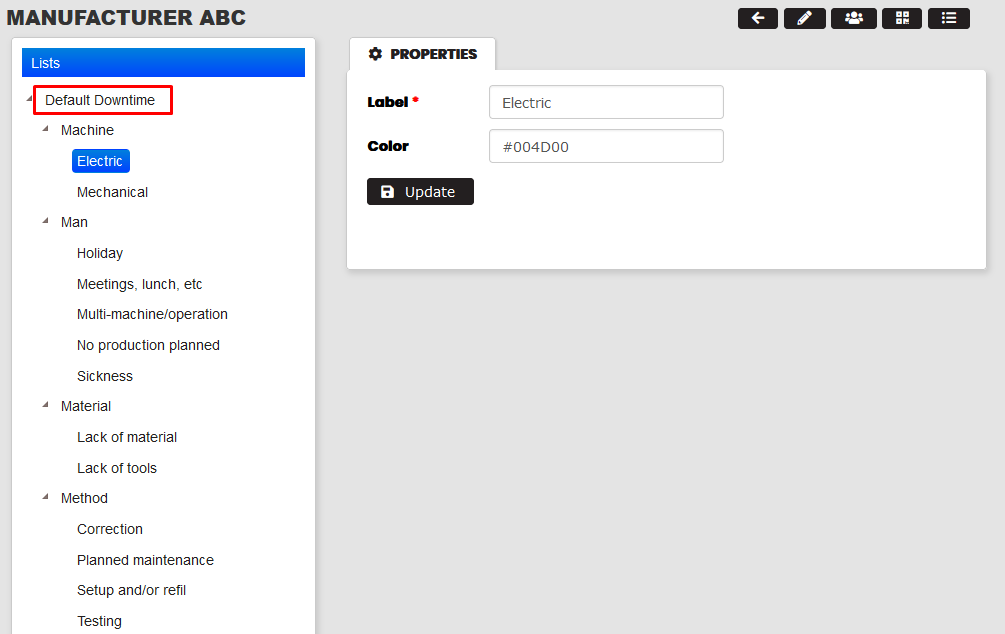 Figure 62: Default downtime reasons
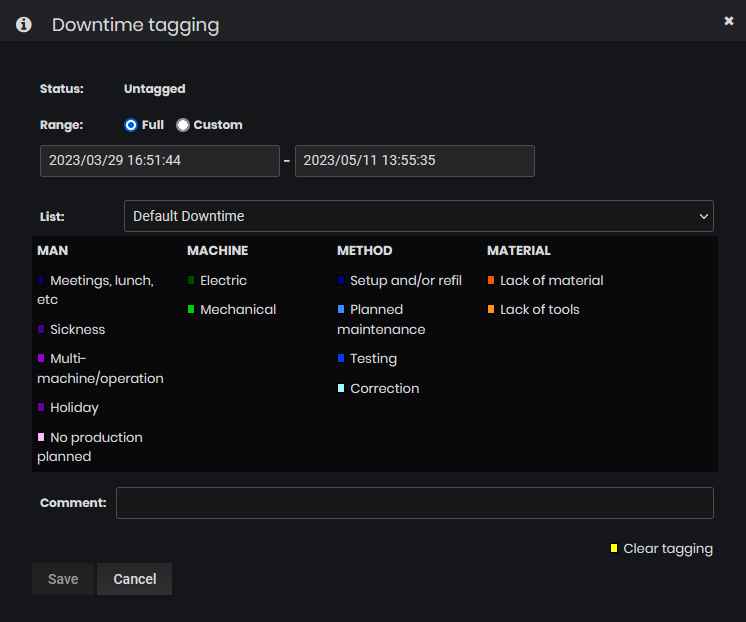 Figure 63: Default downtime reasons as seen in Upkip Visualization
- Each organization is absolutely free to customize the default downtime tagging list, categories and items according to their needs.
- A new Downtime list can be created and set as default for the organization.
- Multiple Downtime lists can be created and then used across organization as machine-specific and/or organization-specific defaults.
Click here for more details on how to create and manage Lists.
Create New
Creating a new downtime list follows the rules of Lists with the following requrements:
- The type of the new list should be Downtime.
- Each top-level list of type Downtime is considered a different set of downtime reasons.
- Only one set of Downtime Reasons can be set as Default.
- The top-list should only have one level of child lists below it. These represent the categories of the downtime list.
- The list items added in these categories represent the actual downtime reasons.
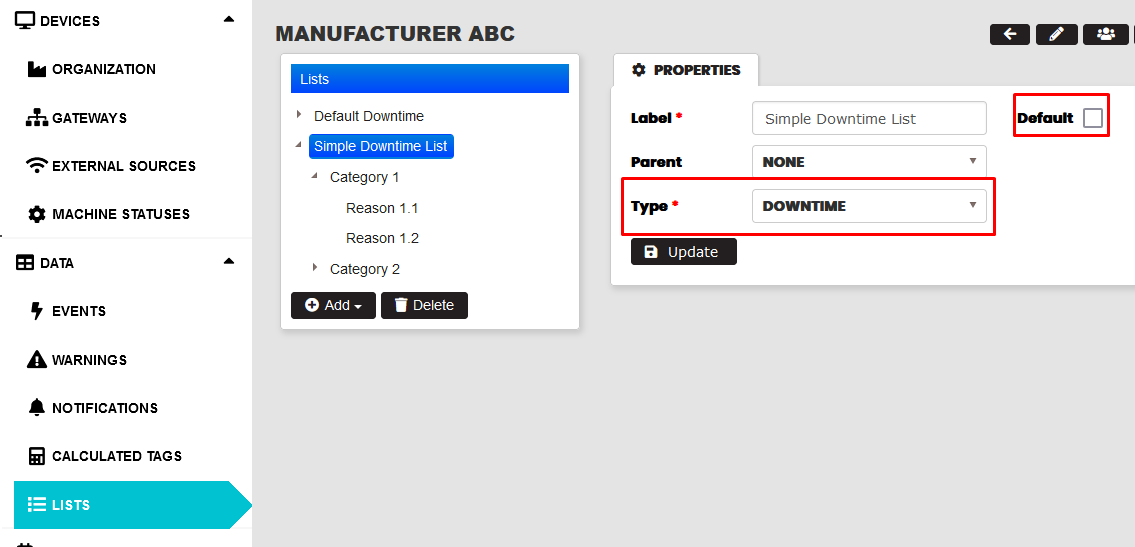 Figure 64: Create new downtime reasons list
Create a new downtime list
Steps to create new downtime list:
- Click Add/List.
- Set Name and Label.
- Choose None for Parent.
- Choose Downtime for Type.
- Check Default if this should be the default downtime list for the organization.
An existing downtime list can be edited when its element is selected in the list structure.
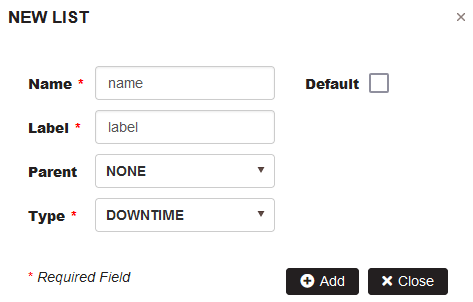 Figure 65: Create new downtime reasons list
Create a new category in the list
Steps to create a new category under a downtime list:
- Click Add/List
- Set Name and Label
- Choose the target downtime list as Parent. The category will be created below it.
An existing category can be edited when its element is selected in the list structure.
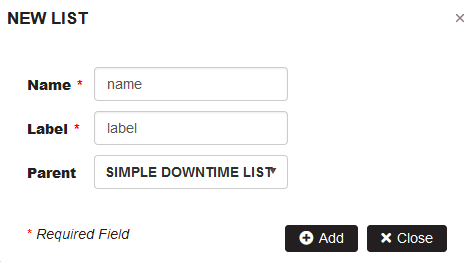 Figure 66: Create new downtime category
Create a reason in the category
Steps to create a new downtime reason under a category:
- Select the target category element in the list structure.
- Click Add/List Item.
- Set Name and Label
- Set a hex color code to the reason. This will be the color of the reason the in Upkip Visualization.
An existing downtime reason can be edited when its element is selected in the list structure.
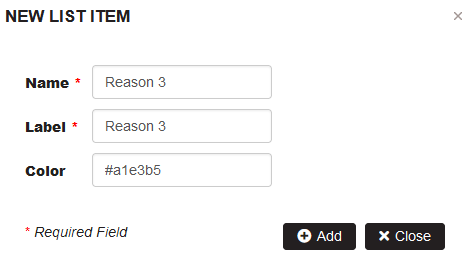 Figure 67: Create new downtime reason
Machine Specific Downtime Reasons
The platform provides the possibility to change the default downtime reasons for a specific machine. This is available via the Properties tab of the selected machine in the Organization structure. For each machine there is a Downtime List property available.
- By default, machines use the organization's default downtime reasons.
- The Downtime List property presents a list of all Lists marked with the type Downtime.
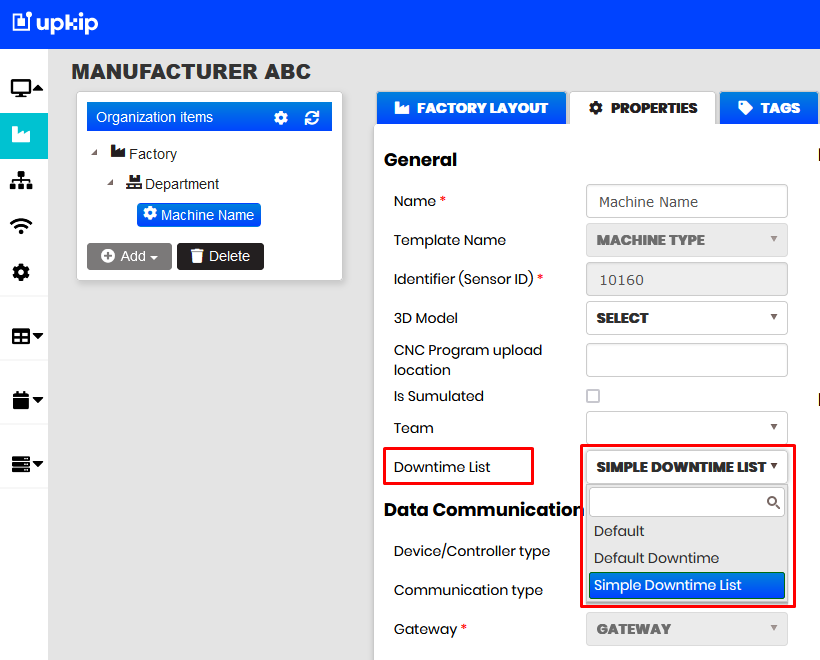 Figure 68: Change default machine dowtime reasons
In the cases when a downtime list different from the organization default is selected, then in the downtime tagging panel two options for downtime list are available:
- The machine default, which is also initially selected.
- The organization default list.
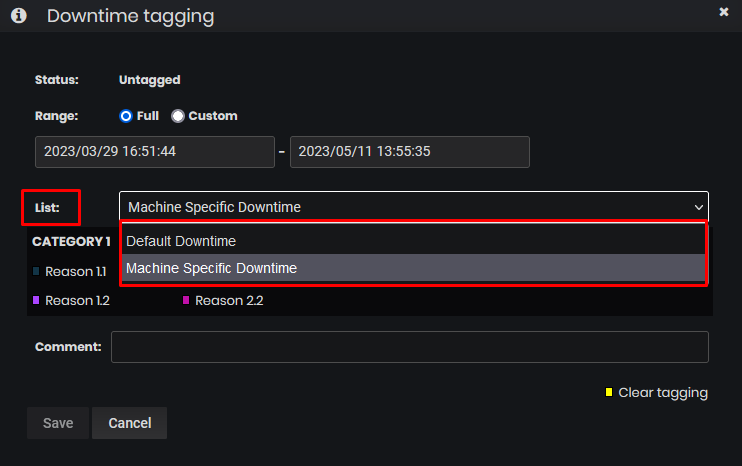 Figure 69: Multiple dowtime reason lists for tagging